Google’s Coral USB Accelerator on the Raspberry Pi Zero (W) – Part 1/2

Google released a lineup of Edge TPU coprocessor-equipped devices called “Coral” with the intent of bring intelligence to the IoT devices at the edge.
At this time the devices are two: the Coral Dev Board and the USB Accelerator; the first one is dedicated to develop an entire intelligent node from scratch, but the second one is meant to bring intelligence to an existing system.
So, the USB Accelerator is the best solution if you have already you project developed and based on a Raspberry Pi, a UP board, a Orange Pi 3, or similar.

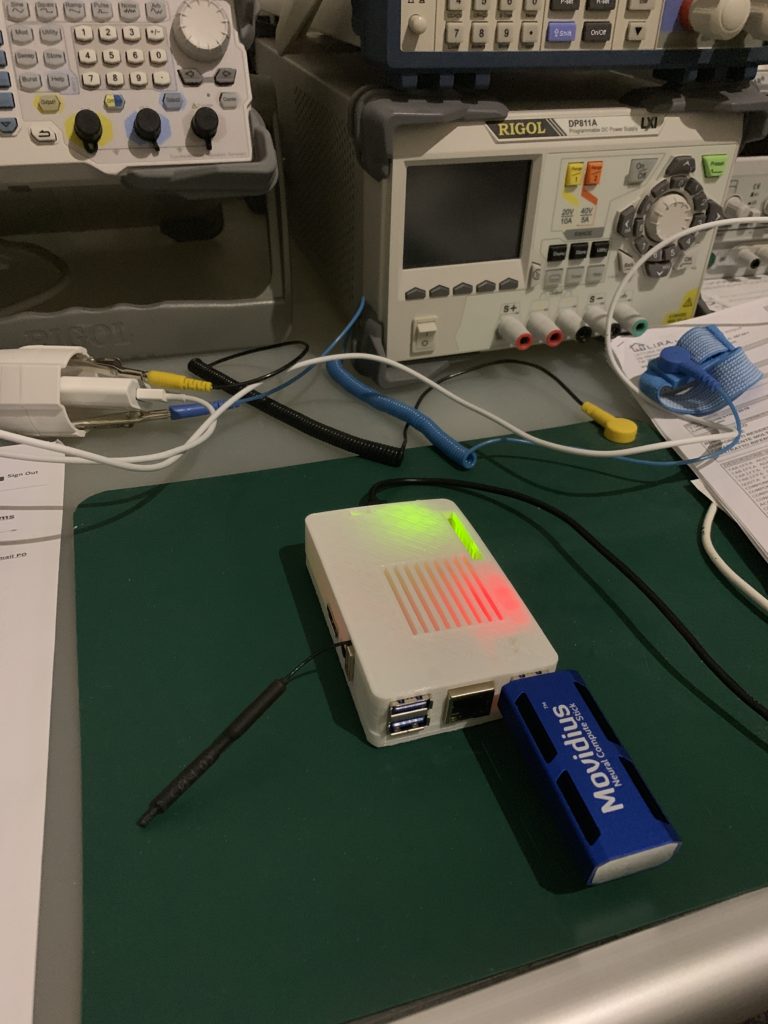
In this article, we will see how to implement the Coral USB Accelerator within a Raspberry Pi Zero.

Required hardware

  • 1 x Raspberry Pi Zero (W)
  • 1 x microSDHC class 6+ / 16+GB
  • 1 x microUSB power supply (5V 2000mA/h)
  • 1 x Google’s Coral USB Accelerator

Taking for granted you have a Raspberry Pi, this case “Zero” (but this should work as the same with other Raspbian-equipped boards) up and running. If you don’t know how to proceed I kindly suggest to follow the guide HERE.

Note: the Raspberry Pi Zero (W or not) is running on a Broadcom BCM2835 32-bit ARM11 (armv6* family) 76JZF-S processor clocked at 1GHz, single-core SoC equipped with 512MB RAM. Usually, the architecture is quite important detail when we manage hardware projects because we could enter in problem of pre-compilation conflicts with ARM SoCs. For example, if we have “armv7-a” pre-compiled binaries we will not able to work with 64-bit-based “armv8-a” CPUs, and even we have code sources, we could be not able to recompile it for our arch type. So, write down this detail!

Pre-Flight check of the Raspberry platform

We need to be sure that everything is up-to-date and we are both aligned on it. As I don’t need a Desktop environment, I opted for Raspbian Stretch Lite, based on Debian 9, and compiled for armv6l architecture (Note: NO armv7*!).

Open on the terminal (direclty on the Pi board, or via SSH).

pi@raspberrypi:~ $ sudo apt-get update
pi@raspberrypi:~ $ sudo apt-get upgrade
pi@raspberrypi:~ $ uname -a

In my case:

Linux raspberrypi 4.19.42+ #1219 Tue May 14 21:16:38 BST 2019 armv6l GNU/Linux

Our Challenge

It’s time to call our bluff: the Google’s Edge TPU APIs is currently only compatible with the Raspberry Pi 3 (model A+ or B+), or its successors, x86 (32 or 64 bit), or other generic ARM64 platform architectures (“armv7l” or “aarch64)), but not with the 32bit low power, low cost, ARM SoC architecture we have on our Raspberry Pi Zero, or of the Raspberry Pi 1st Gen/2nd Gen.

So, what now? Well, we’ll try to find a workaround! 🙂

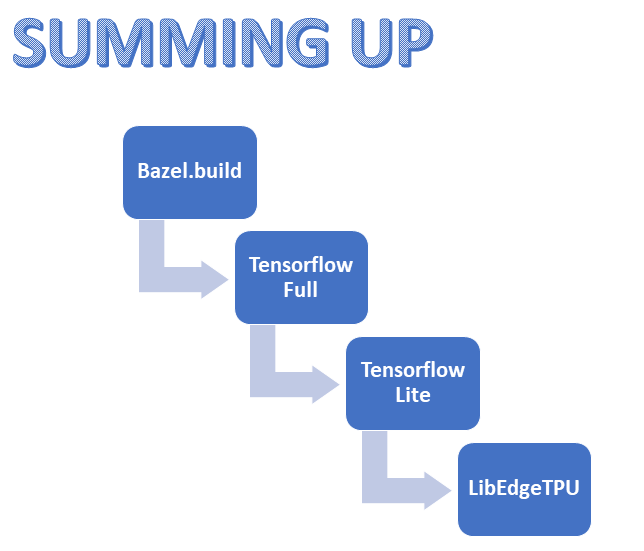
The most obvious thing it’s to recompile the Coral Edge TPU library for the “armv6l” but… it’s not so easy, unfortunately!
The Edge TPU library is built upon Tensorflow Lite framework, that in turn is compiled on the “full” Tensorflow: so, we need to recompile Tensorflow before. To do that, we’ll need have a full installation of Blaze: a free software tool which allows for the automation of building and testing of software. But Blaze doesn’t support our “armv6l” out-of-the-box, so…

Recompiling BLAZE for “armv6l” architecture

To recompile Blaze we need more than 512 Mb of RAM. Not being able to upgrade the soldered built-in RAM on the board, we can create a digital RAM file with the needed size: it’s called “swap file”.

First of all, create a file which will be used as additional swap:

pi@raspberrypi:~ $ sudo dd if=/dev/zero of=/swapfile bs=1024 count=1048576

Set the permissions for the swapfile as only root should be able to write and read the swap file:

pi@raspberrypi:~ $ sudo chmod 600 /swapfile

Use the mkswap utility to set up the file as GNU/Linux swap area:

pi@raspberrypi:~ $ sudo mkswap /swapfile

Activate the swap file:

pi@raspberrypi:~ $ sudo swapon /swapfile

Then, let’s make the change permanent editing the /etc/fstab file:

pi@raspberrypi:~ $ sudo echo '/swapfile swap swap defaults 0 0' | sudo tee -a /etc/fstab > /dev/null

Verify that the swap file is active and working:

pi@raspberrypi:~ $ sudo swapon --show

You should clearly see /swapfile in the output. Or, in alternative:

pi@raspberrypi:~ $ sudo free -h

You should see the additional amount of swap space in the output.
Now, you should adjust the swappiness value: this will force the the kernel to use the swap space more aggressively than usual.

pi@raspberrypi:~ $ sudo echo 'vm.swappiness=100' | sudo tee -a /etc/sysctl.conf > /dev/null

If you want, now you can reboot.

pi@raspberrypi:~ $ sudo reboot

Log back in and install few pre-requisite Debian packages:

pi@raspberrypi:~ $ sudo apt-get install build-essential openjdk-8-jdk python zip unzip git openmpi-bin openmpi-common python-pip

It will also install automatically all the needed dependencies.

Now we can start working over bazel.build recompiling. Let’s download sources in a single and architecture-independent distribution archive from Bazel repository:

pi@raspberrypi:~ $ wget https://github.com/bazelbuild/bazel/releases/download/0.26.1/bazel-0.26.1-dist.zip

Now, unpack and join the workspace:

pi@raspberrypi:~ $ unzip bazel-0.26.1-dist.zip -d bazel-dist
pi@raspberrypi:~ $ cd bazel-dist
pi@raspberrypi:~/bazel-dist $ sudo chmod u+w ./* -R

And compile taking advantage of the additional swap space we created:

pi@raspberrypi:~/bazel-dist $ env EXTRA_BAZEL_ARGS="--host_javabase=@local_jdk//:jdk"  BAZEL_JAVAC_OPTS="-J-Xmx512M -J-Xms512M" bash ./compile.sh

This task could require several hours.
The compiled output is placed into output/bazel. For convenience we will copy this binary to /usr/local/bin (a directory that’s on your PATH).

pi@raspberrypi:~/bazel-dist $ sudo cp output/bazel /usr/local/bin/bazel

Installing requirements for Python/PIP

As it’s always better to not use the Python packages manager (or packages index, a.k.a. pip) directly, let’s prepare a virtual environment to use a workspace.

pi@raspberrypi:~/bazel-dist $ cd ..
pi@raspberrypi:~ $ sudo pip install virtualenv
pi@raspberrypi:~ $ virtualenv tensorflowenv

Now we will operate directly into the virtual environment we just created.

pi@raspberrypi:~ $ source tensorflowenv/bin/activate

And using pip we are going to install all the python package requirements we need:

(tensorflowenv) pi@raspberrypi:~ $ pip install -U pip six numpy wheel setuptools mock future>=0.17.1
(tensorflowenv) pi@raspberrypi:~ $ pip install keras_applications==1.0.6 --no-deps
(tensorflowenv) pi@raspberrypi:~ $ pip install keras_preprocessing==1.0.5 --no-deps

Recompiling Tensorflow for “armv6l” architecture

Download a copy of the latest stable release of Tensorflow (in this specific case is the version 1.12.2):

(tensorflowenv) pi@raspberrypi:~ $ git clone https://github.com/tensorflow/tensorflow.git
(tensorflowenv) pi@raspberrypi:~ $ cd tensorflow
(tensorflowenv) pi@raspberrypi:~ $ git checkout r1.12

Configure your system build by running:

(tensorflowenv) pi@raspberrypi:~/tensorflow $ ./configure

Use bazel to make the TensorFlow package builder with CPU-only support:

(tensorflowenv) pi@raspberrypi:~/tensorflow $ bazel build 

And, taking advantage of this workspace, also the Tensorflow Python package:

(tensorflowenv) pi@raspberrypi:~/tensorflow $ bazel build --config=opt //tensorflow/tools/pip_package:build_pip_package

Getting started with the Coral USB Accelerator

As already briefly advanced before, the Google’s Coral USB Accelerator contains a Google Tensorflow (Co-)Processing Unit (a.k.a. TPU) and through its USB 3.0 Type-C socket can be connected to your (linux-based) development board.

What does it mean? The onboard Edge TPU allows to perform high performance machine/deep learning (convolution neural network) inferencing tasks without having a performing GPU.

To get started, perform the following steps:

pi@raspberrypi:~ $ cd
pi@raspberrypi:~ $ git clone https://coral.googlesource.com/edgetpu-native --branch release-chef
pi@raspberrypi:~ $ cd
pi@raspberrypi:~ $ wget https://dl.google.com/coral/edgetpu_api/edgetpu_api_latest.tar.gz -O edgetpu_api.tar.gz --trust-server-names
pi@raspberrypi:~ $ tar xzf edgetpu_api.tar.gz
pi@raspberrypi:~ $ cd edgetpu_api

Now, lets inject the Tensorflow binaries we need into the edgetpu_api folder.

pi@raspberrypi:~/edgetpu_api $ bash ./install.sh

Ok, that’s all for this first part. I hope you found this quick guide usefull. I am planning to continue with the second/final part of the article in the following weeks. I’ll work as well to add a final look setup and design for my project using the board and the TPU unit.


Further Readings/References

About Coral USB Accelerator:

About Raspberry Pi Zero (W):

Tensorflow:

Miscellaneous:


Last Update: 2019, the August 2nd, Friday

[How To] Install Intel OpenVINO™ toolkit on Orange Pi 3 development board

Orage Pi 3 is a really powerful development board, valid alternative of Raspberry Pi. It has a lot of different I/Os in addition respect to other dev boards clones: for example, on-board soldered eMMC (8GB), 4x full standard USB 3.0 ports, 1x USB 2.0 auxiliary port, PCI Express expansion connector, a powerful Allwinner H6 Quad-core 64-bit 1.8GHZ Cortex™-A53 and a DC input power supply connector (5V-2A).

Orange Pi 3 is available in 4 variants: with/without 8GB emmc and 1GB/2GB onboard RAM.
If we decide for the version missing the 8GB soldered emmc, we’ll need to use an external slower micro-SD(HC) memory, as on Raspeberry Pi.

Further details regard Orange Pi 3 can be found on the official site: orangepi.com.

Now. The idea is to install Intel OpenVINO toolkit/framework on a non-x86-based IoT platform.

What is Intel OpenVINO? It’s a toolkit that help to deploy software solutions with vision computing capabilities (aka Computer Vision, or abbreviated simply CV), and it’s based on a Convolutional Neural Network (CNN) framework. The OpenVINO distribution includes also the Intel DLDT (Deep Learning Deployment Toolkit).

Intel provides a version of OpenVINO™ for GNU/Linux OSs, but it requires a 64bit Intel processor (6th+ generation or Xeon™) and this is not our case as we are playing with a ARM-based cpu.

Otherwise, Intel has released also a 32bit ARM-based version adequate to be installed on the Raspberry Pi: so, optimized specifically to be installed on Raspbian OS and including the OpenVINO Inference Engine, OpenCV, the MYRIAD plugin and few example applications.

Specifically, the Inference Engine is the most important component as it runs the deep learning model. It is composed by a C++ library with a subset of C++ classes to infer input data (images) and get a result; and it provides APIs to read the Intermediate Representation, to set the input and output formats and to execute the model on devices.

Few last notes before starting:

  • The OpenVINO toolkit was formerly known as the Intel® Computer Vision SDK.
  • These steps have been validated with Orange Pi 3 (2GB RAM + 8GB on-board eMMC) but they should work also for other Orange Pi development boards.
  • An internet connection is required to follow the steps in this guide.
  • These steps have been validated to work with the Intel® Movidius™ Neural Compute Stick (Intel® NCS) plugged in one of USB ports but they should work without modifications with the Intel® Neural Compute Stick 2.

Required hardware

  • 1 x Orange Pi 3
  • 1 x microSDHC class 6+ / 32+GB
  • 1 x power supply (5V 3000mA/h) with microUSB or 4×1.7mm socket
  • Intel® Movidius™ Neural Compute Stick (Intel® NCS) or Intel® Neural Compute Stick 2

Method 1: using the official Debian image for Orange Pi 3

Statement of the problem here: this method was harder that expected as the official Debian image released by Xunlong Software CO. (manufacturer of Orange Pi boards) is versioned as Jessie (Debian 8) and compiled for “aarch64” architecture.
Unfortunately, Jessie is now labeled as “oldstable” and all its repository were moved to Debian Archive: this cause few issue that we’ll try to bypass with the following steps.

Ok. Let’s start.

First of all I’ll take for granted that you already have a working board with the official release of Debian 8 “Jessie” Server for Orange Pi 3 on it (image named “OrangePi_3_jessie_server_v1.0.img”). You can follow instructions in the manual to do it.
In addition, I am also taking for granted that your Orange Pi 3 is connected to the internet: we’ll need to download few files (also, date/time need to be adjusted). If not, I suggest to use nmtui to do so.

Now. As I already stated briefly before, Debian 8 is not the best as its repository seems to be not complete anymore (for example, “binary-amr64” and others are now missing). We’ll need to upgrade from Debian 8 to Debian 9 (from “Jessie” to “Stretch”) as we’ll need to install few packages from the repositories.

In the terminal of your orangepi type:

~$ sudo mv /etc/apt/sources.list /etc/apt/sources.list.old
~$ sudo nano /etc/apt/sources.list

Enter the following new repository URLs:

deb http://ftp.debian.org/debian/ stretch main contrib non-free
#deb-src http://ftp.debian.org/debian/ stretch main contrib non-free

deb http://ftp.debian.org/debian/ stretch-backports main contrib non-free
#deb-src http://ftp.debian.org/debian/ stretch-backports main contrib non-free

deb http://security.debian.org/ stretch/updates main contrib non-free
#deb-src http://security.debian.org/ stretch/updates main contrib non-free

deb http://ftp.debian.org/debian/ stretch-updates main contrib non-free
#deb-src http://ftp.debian.org/debian/ stretch-updates main contrib non-free

[Ctrl+X], “y” and [ENTER] to save and exit from the editor. Now we can update the repositories with:

~$ sudo apt-get update
~$ sudo apt-get upgrade
~$ sudo apt-get dist-upgrade

Feel free to reboot now! Unfortunately, it seems that reboot command is not well supported by the board (at least on mine). So just shutdown and power up back the board manually:

~$ sudo shutdown -h now

To be sure that everything worked properly, we need now to perform database sanity and consistency checks for partially installed, missing and obsolete packages through the command:

~$ sudo dpkg -C
~$ sudo apt-mark showhold

Hopefully you are not receiving any message by the commands above. So, keep moving! (If yes, sympathy for you: troubleshoot.)

As prerequisite, we need now to install few packages:

~$ sudo apt-get install build-essential cmake lsb-release libtbb2 libtbb-dev libtbb2-dbg

Note: Cmake will be required for building the Inference Engine sample applications.

The openVINO toolkit for Raspbian OS is distributed without a proper installer, so we can download the files on our Orange Pi board:

~$ cd
~$ mkdir OpenVINOfiles
~$ cd OpenVINOfiles
~/OpenVINOfiles$ wget https://download.01.org/opencv/2019/openvinotoolkit/l_openvino_toolkit_raspbi_p_2019.1.094.tgz

In this tutorial I am using the version 2019.1.094, but I suggest to always check the latest version on Intel Open Source Technology Center.
Create the system installation folder for OpenVINO.

~/OpenVINOfiles$ sudo mkdir -p /opt/intel/openvino

Now we can step forward and decompress our downloaded archive:

~/OpenVINOfiles$ sudo tar -xf l_openvino_toolkit_raspbi_p_2019.1.094.tgz --strip 1 -C /opt/intel/openvino

If everything went as we need you’ll find 6 new folders inside /opt/intel/openvino. Check with:

~/OpenVINOfiles$ ls -las /opt/intel/openvino/

total 32
4 drwxr-xr-x 8 root root 4096 Jun 2 21:14 .
4 drwxr-xr-x 3 root root 4096 Jun 2 21:13 ..
4 drwxrwxr-x 2 root root 4096 Apr 1 12:55 bin
4 drwxrwxr-x 3 root root 4096 Apr 1 12:55 deployment_tools
4 drwxrwxr-x 8 root root 4096 Apr 1 12:55 inference_engine
4 drwxrwxr-x 2 root root 4096 Apr 1 12:55 install_dependencies
4 drwxrwxr-x 8 root root 4096 Apr 1 12:55 opencv
4 drwxrwxr-x 4 root root 4096 Apr 1 12:55 python

Modify the setupvars.sh script by replacing with the absolute path to the installation folder:

~/OpenVINOfiles$ sudo sed -i "s|<INSTALLDIR>|/opt/intel/openvino|" /opt/intel/openvino/bin/setupvars.sh
~/OpenVINOfiles$ sudo sed -i 's/armv7l/aarch64/gI' /opt/intel/openvino/bin/setupvars.sh
~/OpenVINOfiles$ sudo sed -i 's/Raspbian/Debian/gI' /opt/intel/openvino/bin/setupvars.sh

To compile and run the OpenVINO toolkit applications on the board an update for the system environment variables is required, the setupvars.sh script will update them for us.

~/OpenVINOfiles$ sudo chmod +x /opt/intel/openvino/bin/setupvars.sh
~/OpenVINOfiles$ sudo /opt/intel/openvino/bin/setupvars.sh

[setupvars.sh] OpenVINO environment initialized

Remember: you should run the setupvars.sh script everytime you’ll open a shell and you want to play with OpenVINO. If you want to make the process automatic you can edit the bash runtime configuration file as follows:

~/OpenVINOfiles$ echo "source /opt/intel/openvino/bin/setupvars.sh" >> ~/.bashrc

Unfortunately, the default user “orangepi” is not part of “users” group on the system, so we need to patch with:

~$ sudo usermod -a -G users "$(whoami)"

Now, if you own a Intel Movidius Neural Compute Stick or a Intel Neural Compute Stick 2 it’s time to attach it in one of the USB 3.0 (the blue ones) socket; then, reboot.

~/OpenVINOfiles$ sudo shutdown -h now

Switch back on and Log In again.
To be able to perform inference on the Movidius devices, you need to set USB rules through:

~$ sudo cp /opt/intel/openvino/deployment_tools/inference_engine/external/97-myriad-usbboot.rules /etc/udev/rules.d/
~$ sudo udevadm control --reload-rules
~$ sudo udevadm trigger
~$ sudo ldconfig

Unfortunately, we can not use the pre-compiled version of opencv contained in the Raspberry package. So we’ll need to compile it from its sources for the aarch64 architecture:

~$ cd OpenVINOfiles
~/OpenVINOfiles$ git clone https://github.com/opencv/opencv.git
~/OpenVINOfiles$ git clone https://github.com/opencv/opencv_contrib.git
~/OpenVINOfiles$ cd ~/opencv
~/OpenVINOfiles$ mkdir build
~/OpenVINOfiles$ cd build
~/OpenVINOfiles$ cmake -D CMAKE_BUILD_TYPE=Release -D CMAKE_INSTALL_PREFIX=/usr/local ..

Correcting few files written for armv7l (the cpu of the Raspberry gen 1) to be compiled on aarch64 (the cpu presents on our Orange Pi 3):

~/OpenVINOfiles$ sudo sed -i 's/armv7l/aarch64/gI' /opt/intel/openvino/deployment_tools/inference_engine/samples/CMakeLists.txt
~/OpenVINOfiles$ sudo sed -i 's/armv7l/aarch64/gI'  /opt/intel/openvino/deployment_tools/inference_engine/share/InferenceEngineConfig.cmake
~/OpenVINOfiles$ sudo mkdir /opt/intel/openvino/deployment_tools/inference_engine/lib/aarch64
~/OpenVINOfiles$ sudo cp -R /opt/intel/openvino/deployment_tools/inference_engine/lib/armv7l/* /opt/intel/openvino/deployment_tools/inference_engine/lib/aarch64
~/OpenVINOfiles$ sudo mkdir /opt/intel/openvino/inference_engine/lib/aarch64
~/OpenVINOfiles$ sudo cp -R /opt/intel/openvino/inference_engine/lib/armv7l/* /opt/intel/openvino/inference_engine/lib/aarch64
~/OpenVINOfiles$ sudo mkdir /opt/intel/openvino/python/python3.5/aarch64
~/OpenVINOfiles$ sudo cp -R /opt/intel/openvino/python/python3.5/armv7l/* /opt/intel/openvino/python/python3.5/aarch64
~/OpenVINOfiles$ git clone https://github.com/fbaldassarri/opencv-sun50iw6p1.git
~/OpenVINOfiles$ cd opencv-sun50iw6p1
~/OpenVINOfiles/opencv-sun50iw6p1$ sudo cp -R lib/* /opt/intel/openvino/opencv/lib
~/OpenVINOfiles/opencv-sun50iw6p1$ cd ..

To be able to run pre-trained network (for example, Face Detection or Object Detection) using the Inference Engine you’ll need to create/navigate to a directory of which you have read/write permissions. Let’s create one as subfolder of our OpenVINOfiles:

~/OpenVINOfiles$ mkdir build
~/OpenVINOfiles$ cd build

Let’s try compiling through cmake the Inference Engine samples provided by Intel inside the OpenVINO distribution toolkit:

~/OpenVINOfiles/build$ cmake -D CMAKE_BUILD_TYPE=Release -D CMAKE_CXX_FLAGS="-march=armv8-a" /opt/intel/openvino/deployment_tools/inference_engine/samples 

Now you can build all the samples in one shoot:

~/OpenVINOfiles/build$ make -j2

Or, you can even build a specific sample within this directory, for example the Object Detection Sample:

~/OpenVINOfiles/build$ make -j2 object_detection_sample_ssd

Download the pre-trained Face Detection model, the .bin file contains the model with weights and the .xml contains the network topology:

~/OpenVINOfiles/build$ wget --no-check-certificate https://download.01.org/opencv/2019/open_model_zoo/R1/models_bin/face-detection-adas-0001/FP16/face-detection-adas-0001.bin
~/OpenVINOfiles/build$ wget --no-check-certificate https://download.01.org/opencv/2019/open_model_zoo/R1/models_bin/face-detection-adas-0001/FP16/face-detection-adas-0001.xml

Go ahead running the sample with specifying the model and a path for the input source image:

~/OpenVINOfiles/build$ ./aarch64/Release/object_detection_sample_ssd -m face-detection-adas-0001.xml -d MYRIAD -i <path_to_image>

The application should output an image (out_0.bmp) with detected faced enclosed in rectangles.

Time to clean up our workspace:

~/OpenVINOfiles/build$ cd
~/OpenVINOfiles$ cd OpenVINOfiles
~/OpenVINOfiles$ rm -r l_openvino_toolkit_raspbi_p_2019.1.094.tgz
~/OpenVINOfiles$ rm -r opencv-sun50iw6p1
Orange Pi 3 enclosed in a 3D printed case and with the Intel® Movidius™ Neural Compute Stick

Method 2: using the un-official Armbian image for Orange Pi 3

Statement of the problem here: the image of Armbian is not official release of Xunlong Software CO. and it could not support completely all the features of Orange Pi 3 board; in addition, it still in “unstable” release. But, it is already updated at Debian 9 “Stretch” and it has few interesting tweaks.

The process is quite the same of the method 1, but first of all you need to use the latest nightly build of Armbian for Orange Pi 3 at the following link: https://dl.armbian.com/orangepi3/.


Further Readings

About Orange Pi:

About Intel OpenVINO toolkit:


Last Update: 2019, the June 8th