I am so excited to announce a new project I am working on as part of my new developed interests and experiences!
I am launching a new blog, dedicated to Generative AI, but completely focused over the idea to have a personal, local, secure, ethical, and developed using your own hardware, without spending money for new one.
Generative AI is undoubtedly incredible: everyday it is demonstrating phenomenal abilities and a proven potential across thousands of different scenarios. However, it also demonstrates the requirement of massive amount in computational resources to run: really impractical for many average users who would like to practice without investing thousands of dollars to just experiment with it and find the right tool.
My mission is to help driving the evangelism and the development of solutions that allow to execute simple, complex, and, why not, super advanced tasks on your hardware, without the need of cloud providers or bled yourself dry to buy a new GPU.
Embark with me on this journey to discover new tools, new algorithms, and new tricks to run Generative AI on prem. On your bare metal.
No expensive subscriptions or uncontrollable billing on your credit card.
I will focus on a few key concepts:
open source All the solutions proposed are freely available to you: to download, to try, to uncover, to replicate, and to improve with your contributions. AI should always be part of human knowledge as literature and science.
local Local Training. Local Tuning. Local Inference. Local RAG. Going local means taking full advantage of your hardware, saving money and going green.
personal Personal also means “Out of the grid”, so you’ll able to also download the tools you need, allowing you to directly experiment in your homelab, with consumer-grade hardware.
private Private is synonym of secure. Your documents, your info, your secrets remain yours, residing in your local storage.
ethical Develop a responsible AI, balancing censorship and reducing the bias of the information without the influences of governments and big tech corporations. Make it yours.
community Fostering collaboration and international cooperation in AI democratization.
Join me in my new adventure, and let me know your feedback and your ideas!
After a long time, I am returning to write on the pages of this blog. I am so sorry. Maybe, you are thinking that it’s not so complex to find a brief time slot once a week to put down a few rows to keep my audience aligned on what I am doing, the news, and a few exciting projects I am working on. But, no, in the end, it’s really hard.
Let me resume the last few years: I started this blog as a showcase of what I was, and what I was capable of. At the time, I was quitting Google, as Google Cloud Platform Community Manager for EMEA, and I was terrified I should not be able to find another excellent (or, at least, good) job. With the term “excellent” or “good”, I don’t mean in the sense of “profitable”; in fact, earning money and saving them for the future was never the point for me. I never worked for the profit. I swear.
I always did it for me: the actual income was my joy in exploring something new, to feel I was a big gear in a massive mechanism. Something relevant. Someone on the stage presenting geeky stuff, always protagonist, always in touch with his community. Consider that: back in 2011, I started working for Intel, directly before completing my university degree, then I switched to Google. Two huge companies. One after another. I was young, and I started directly flying in the sky touching the stars. Leaving Google was equal to fall back on the earth. At the time, I was saying to myself “ok, now I need to jump into another big tech company. I need to do it. It’s life or death”.
So, I started the blog.
I needed to showcase recruiters more than what was on my cv or on my LinkedIn profile.
Since then, things changed a lot. I stopped challenging myself. I was forced to refocus. To re-evaluate my aspirations, what’s really important for me, and, probably most important, to find a new balance between my personal life and my job.
Today, I am back. Back to find again joy in what I am doing, besides what it brings to my career, to my resume.
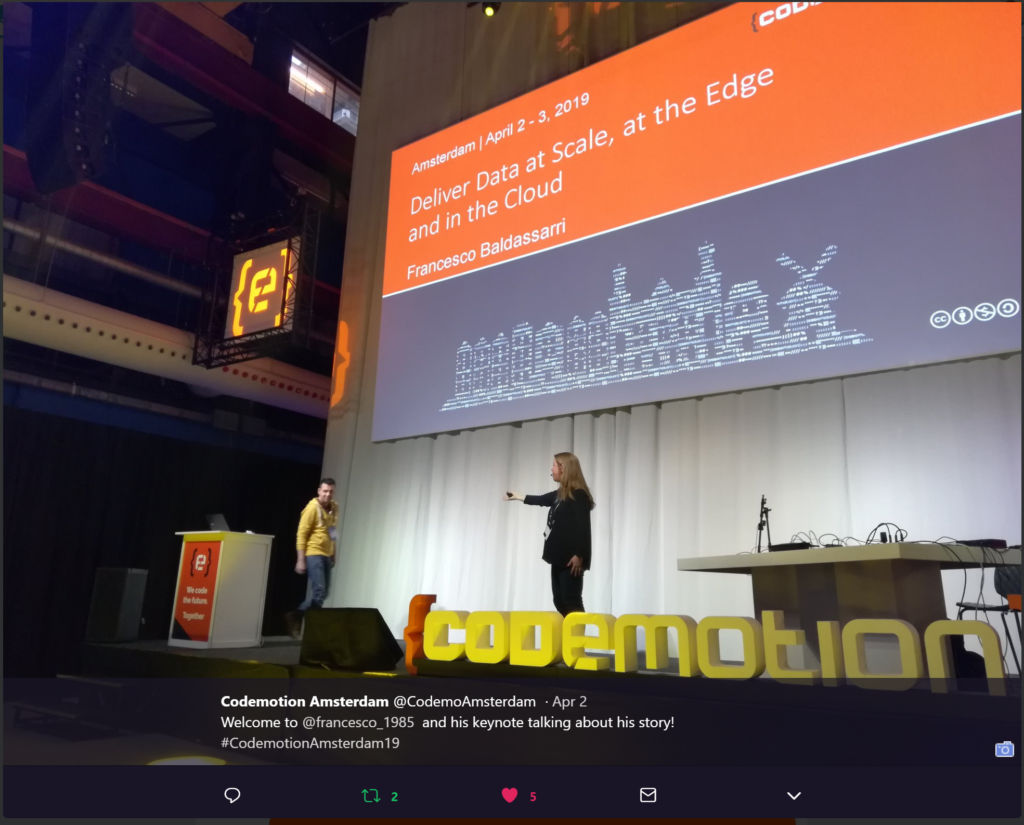
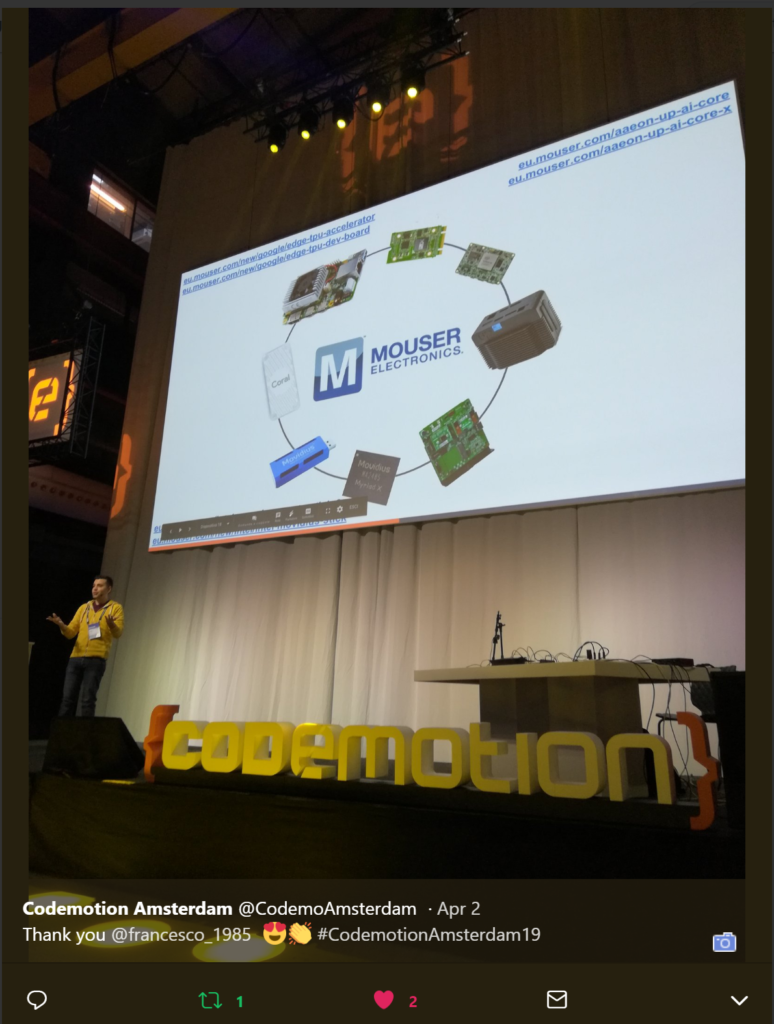
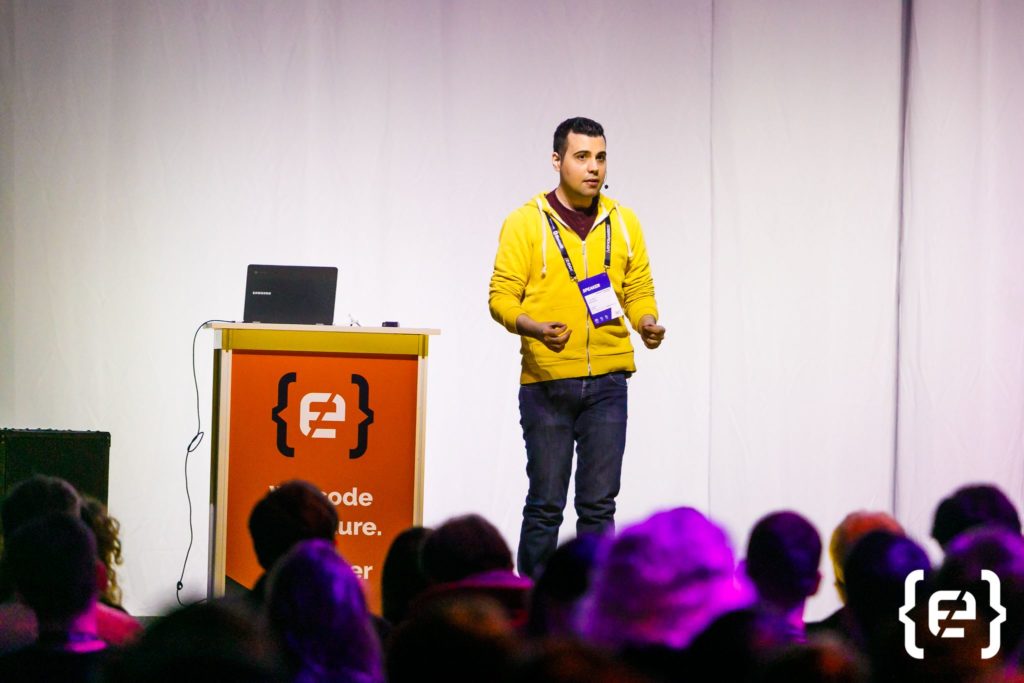
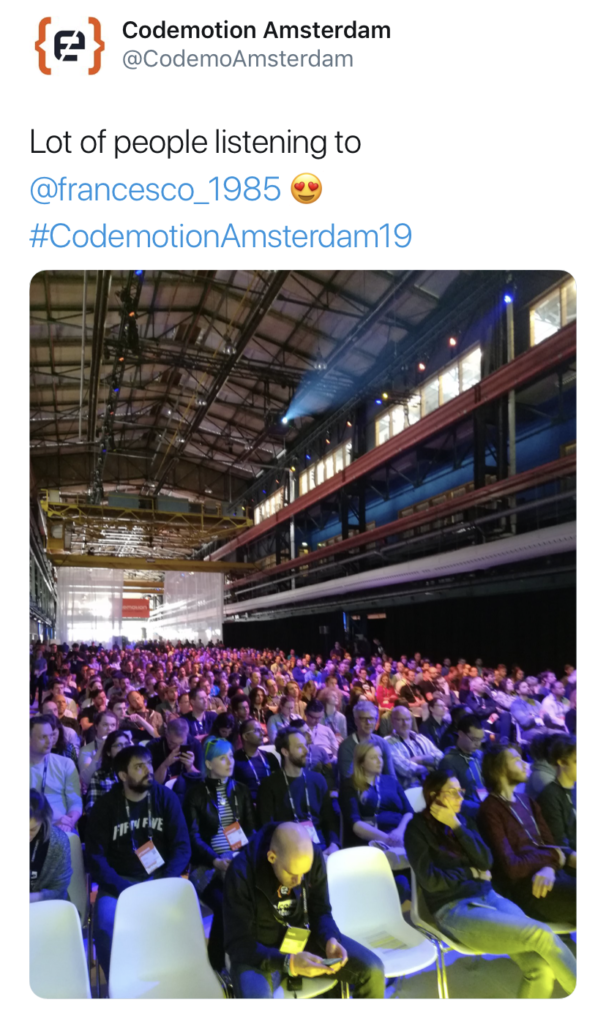
Seems yesterday I was invited to held the keynote of Codemotion Amsterdam 2019 , and immense pure joy, but during 2020, ’cause of the global pandemic, I was not able to join any event since February. Some light at the end of the tunnel, thanks again Codemotion Team who invited me to join the online version of the Italian Edition of the conference with an active role.
In details, “my day” will be totally dedicated to “AI/MACHINE LEARNING, TEAM & TECH CAREER” and this makes me just more than happy and honoured to be part of an amazing event.
My duties will consist in present speakers, drive the agenda during the whole day, address questions and supporting requests provided by the audience.
I still have two extra-Premium tickets to donate for free to my readers, so feel free to drop me an email through the Contact Form if you are interested in joining this incredible technical conference!
Moving on my plans to enlarge my knowledge with a logic leitmotif, I decided that the correct next step was to improve my skill in prototyping my ideas. I am able to conceive little funny (stupid) electronic device, like beacon, <>… But once finished the electronic logic, the circuit board, the board schematic and to write code you have to create the shell in order to achieve the status of “working prototype”.
The “final” step of prototyping by the way it’s not so easy or fast if you are not familiar with 3D technical design. In the past, I used to draw my cases with Sketch, then I passed the .stl file to my 3D printer (a Flashforge Finder gen 1), but it was not the smartest way to procede: in fact, you will really fortunate to have a first print that’s exactly fit the circuit board. Usually, you have to print, check the case, correct the design and reprint. This is a cost, both in term of printing PLA filament, in time and in energy to invest.
In addition, SketchUp, that I used to use on daily basis is not available anymore as standalone version for the free edition (the last free version you can install on your machine still the 2017 Maker Edition); now, it’s browser-based and not so comfortable to use.
So, thank a proficient discussion with a friend of my Hacker/Maker Space in Bologna (fablabbologna.org), I enjoyed to learn about the parametric design: in this 3D modeling technique you will be super faster in correct the design changing only few parameters using, for example, slide selector. You have not to redraw entire stage of your model wasting time.
Giovanni Ferrari was so gentle to invest hours and hours of his time to teach me Grasshopper 3D: a plug-in for Rhinoceros 3D that, thanks to a visual programming language interface, presents the users to create and edit geometry.
On Grasshopper, components (or nodes) are dragged onto a canvas in order to build a definition. It’s based on graphs that map the flow of relations from parameters through user-defined functions (the nodes): this is resulting in the generation of geometry. Changing the parameters or the geometry itself causes the changes to be propagated throughout all functions in the project, and the geometry to be redrawn.
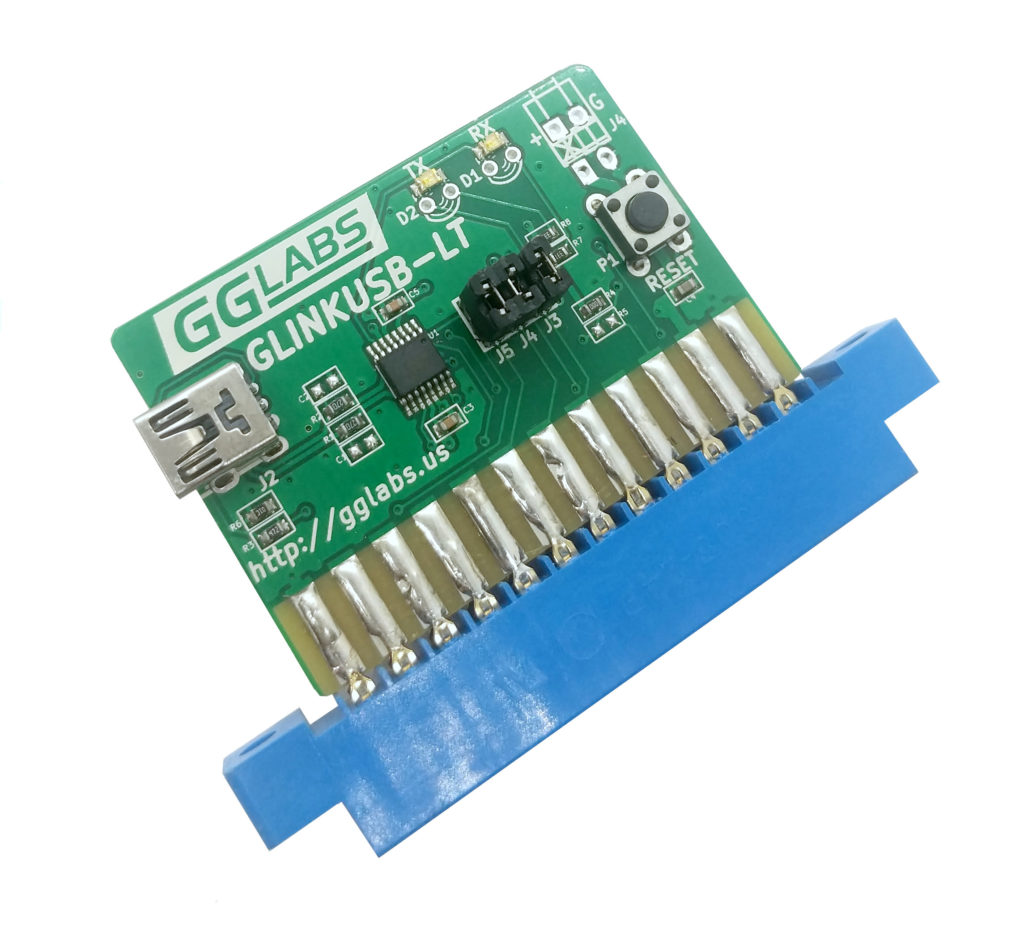
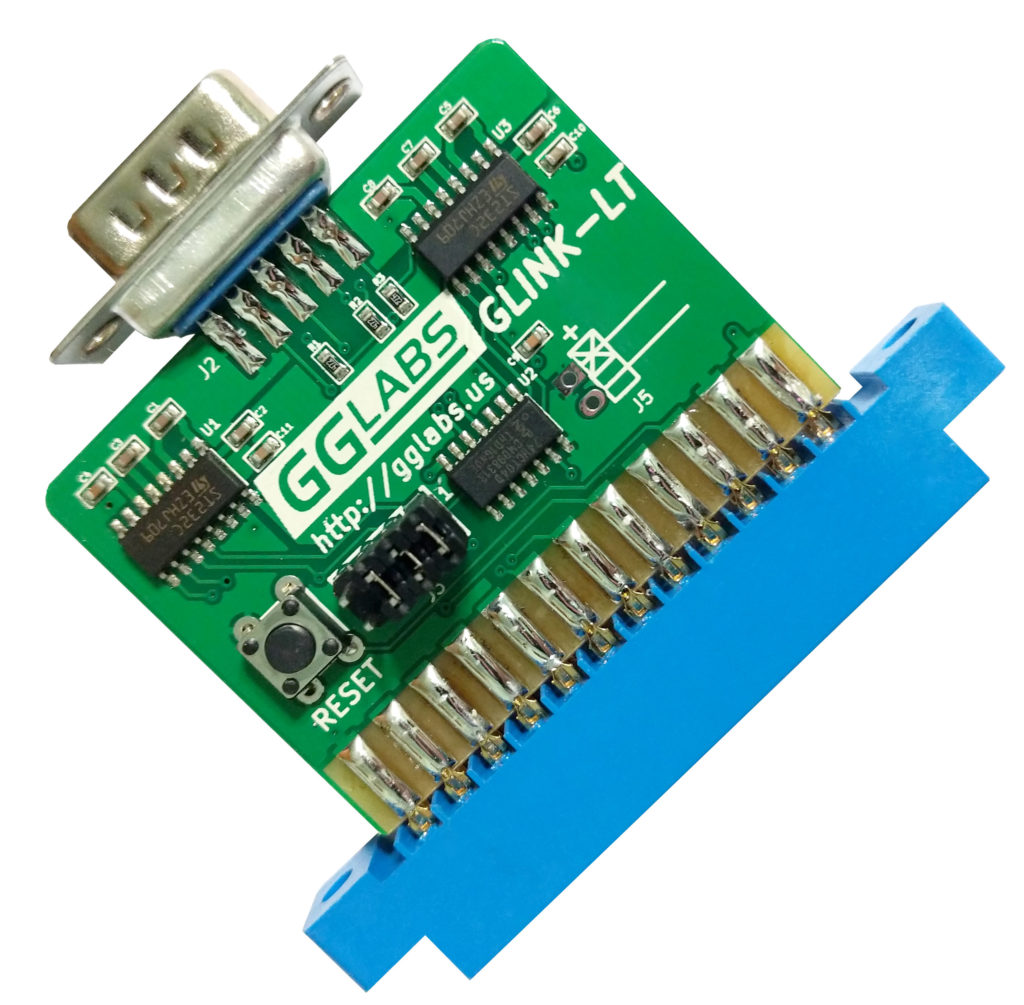
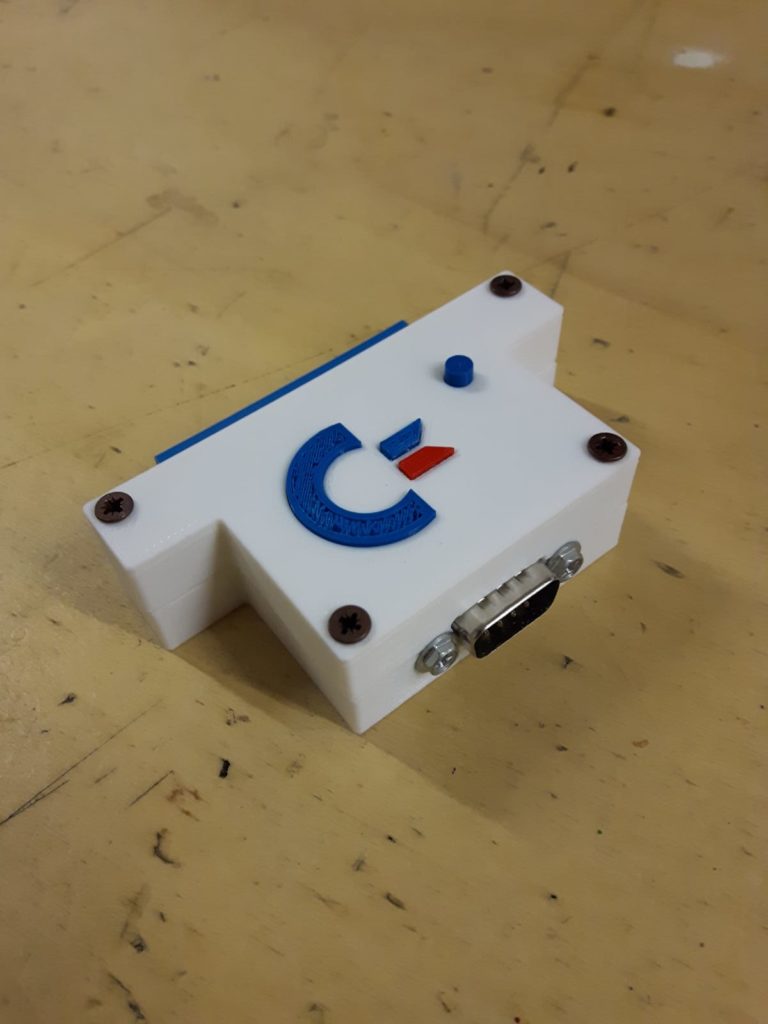
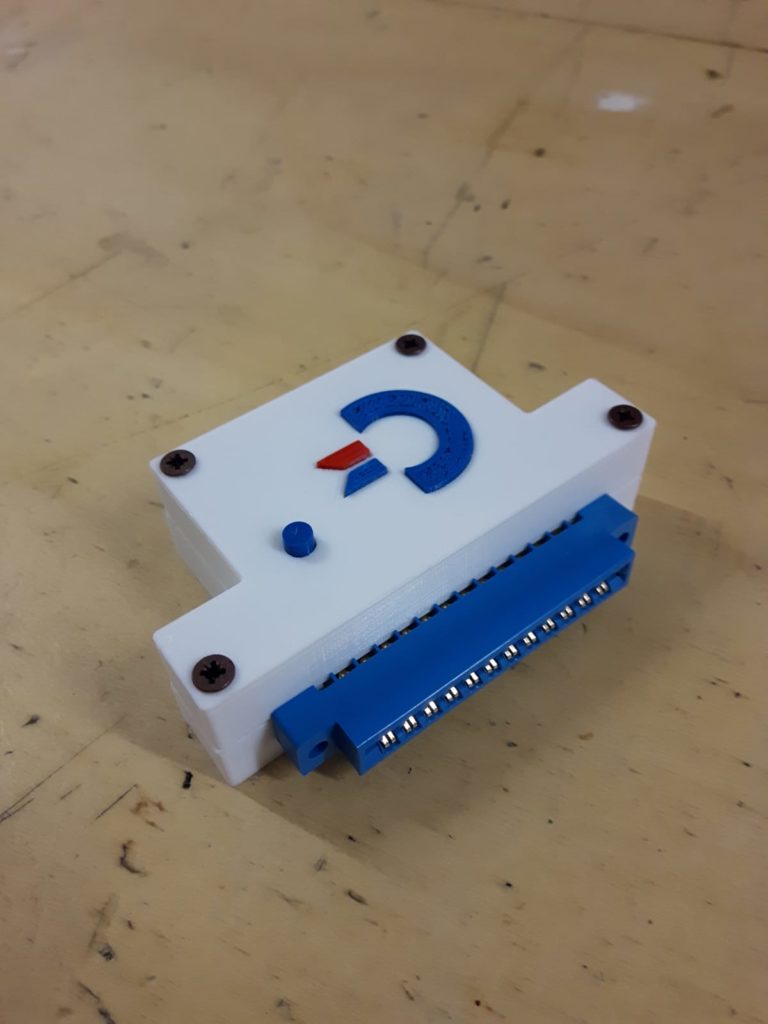
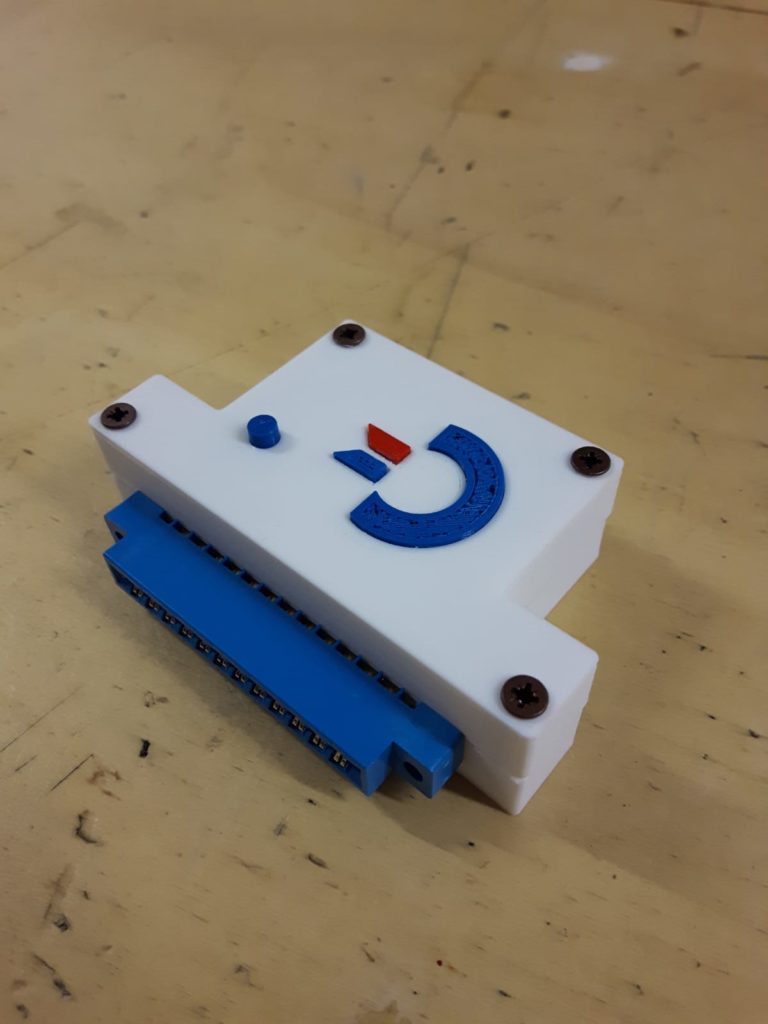
I decided the best way to start my learning phase on parametric design was to create a simple case for two boards I purchased on eBay. These boards boards are Serial User Port to RS232 (GLINK-LT) and to USB (GLINKUSB-LT) for Commodore 64 and 128 from GGlabs.us. These devices allow to communicate through serial port on Windows/Linux/Mac OS computer using the user port on Commodore 8-bit machines.
You can see the challenge.
Same user port for the Commodore. But on the other side, different ports for standard RS232 and mini-usb socket, in addition, also the reset button is moving its position.
With Giovanni, we decided to move on drawing the case on Grasshopper, but on the same design file. So: one design file for two different boards.
After weeks of tries and tries, of printing errors, refining, at the end we reached a very satisfying result!
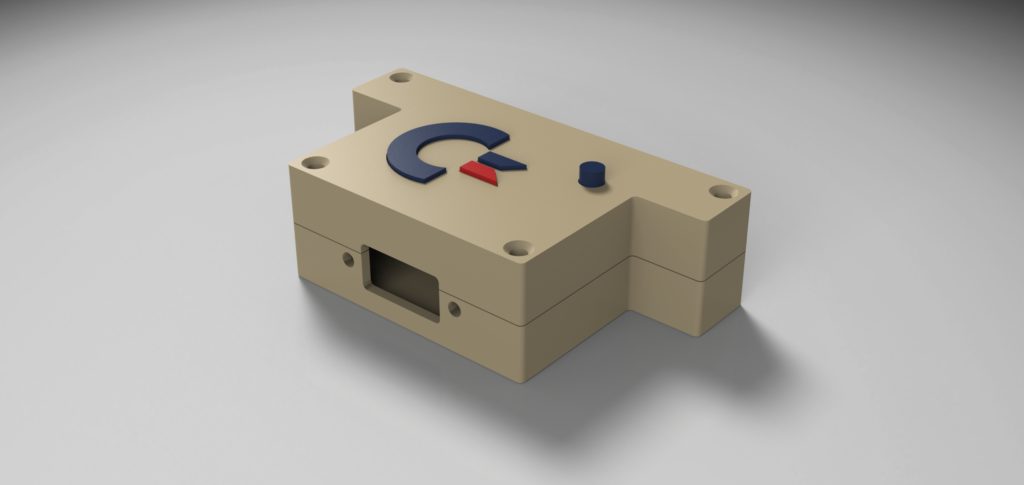
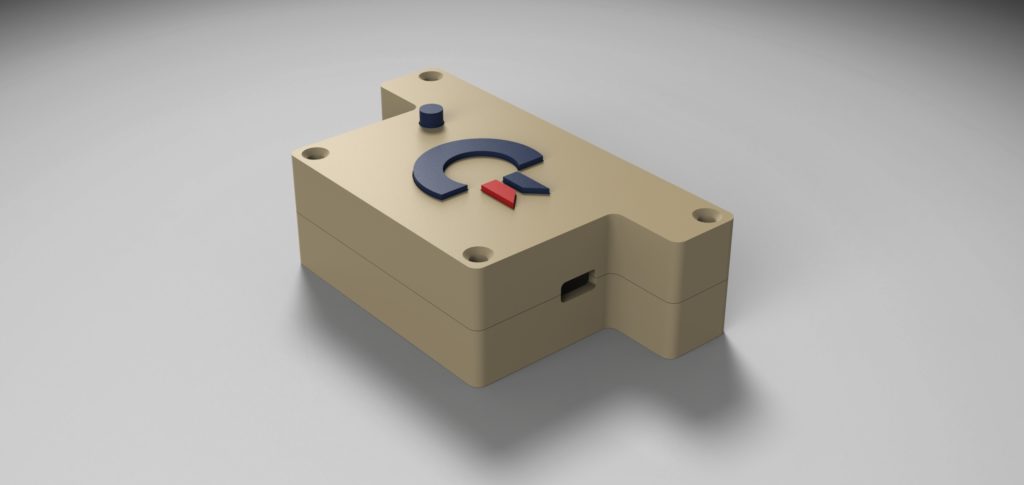
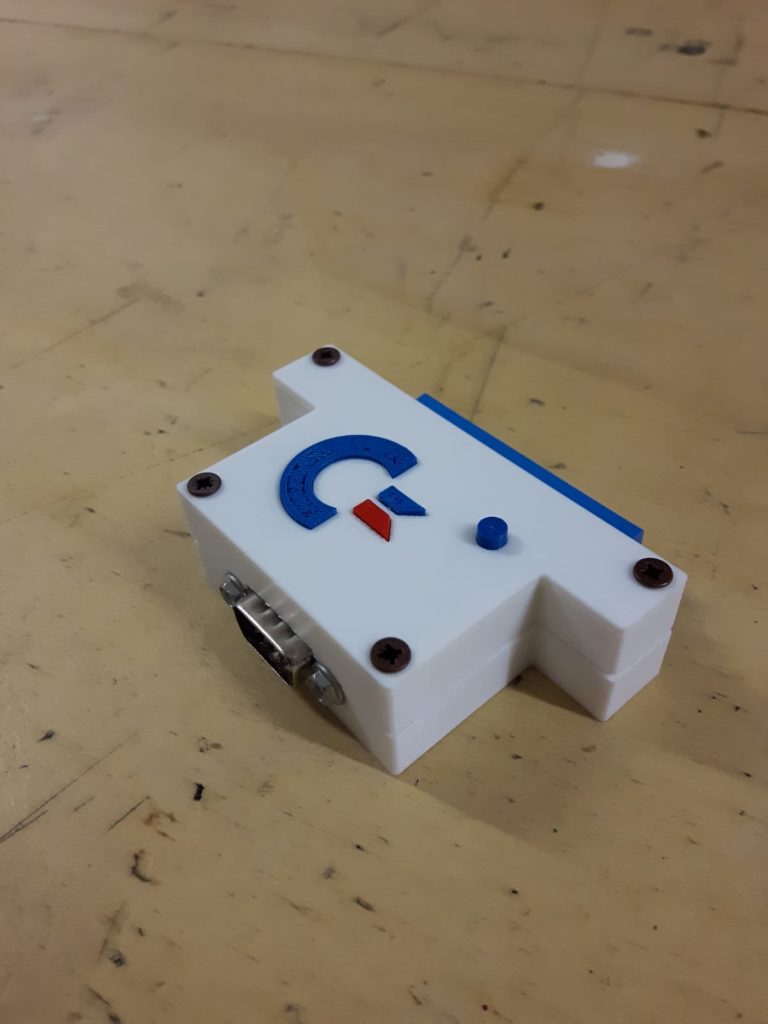
The RS232 version by the front side.
The RS232 by the back side.
The mini-USB version by the front side.
The mini-USB version by the back side.
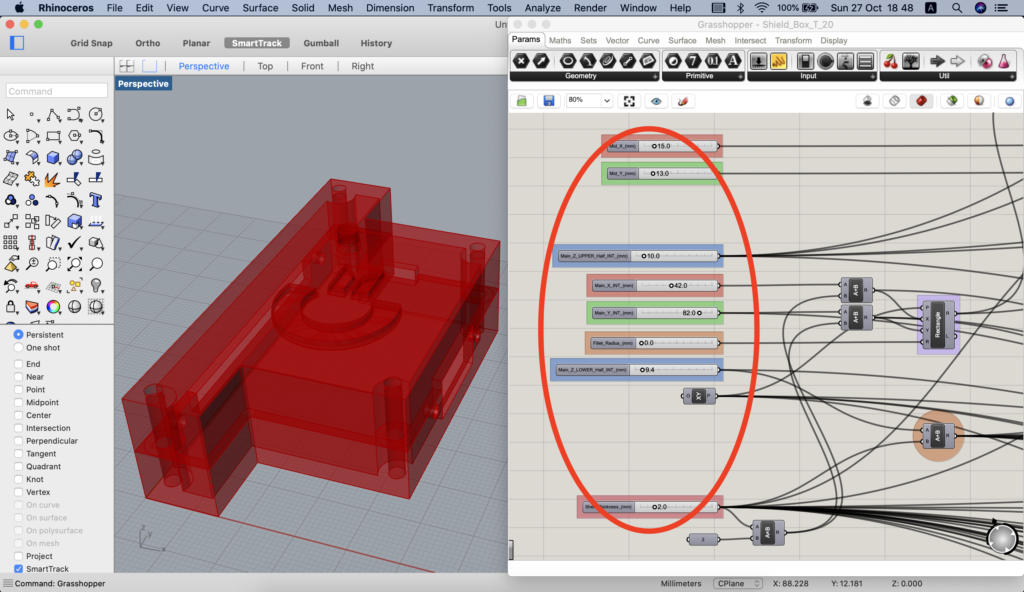
As already said, having both the two versions of the case in the same definition was challenging. The result is something like that:
Grasshopper Definition
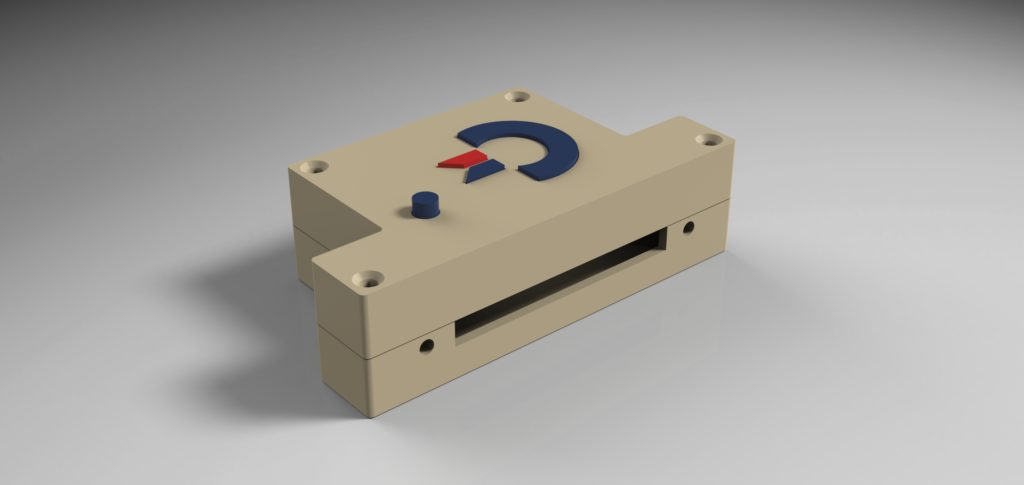
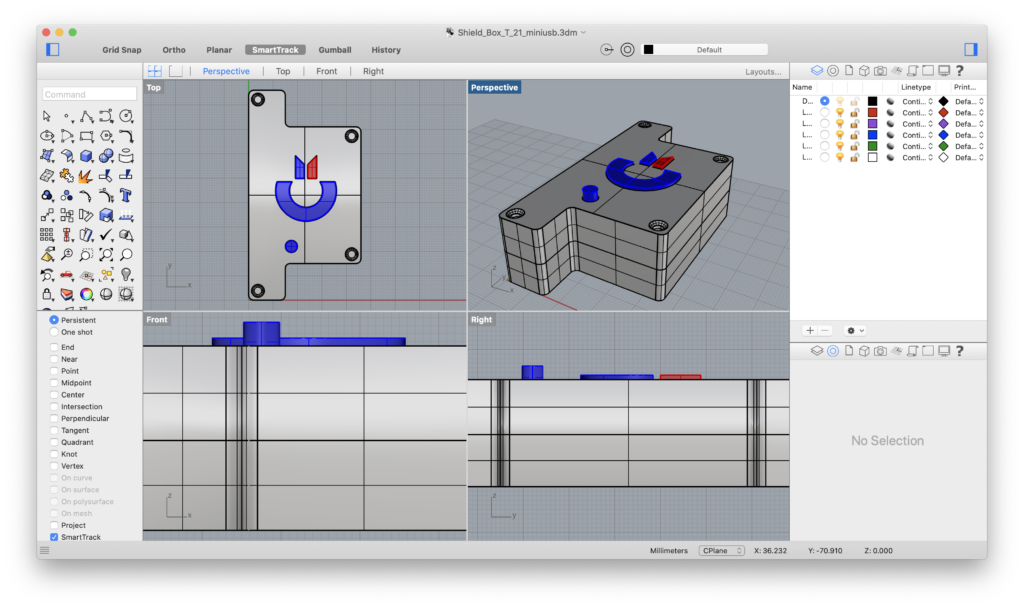
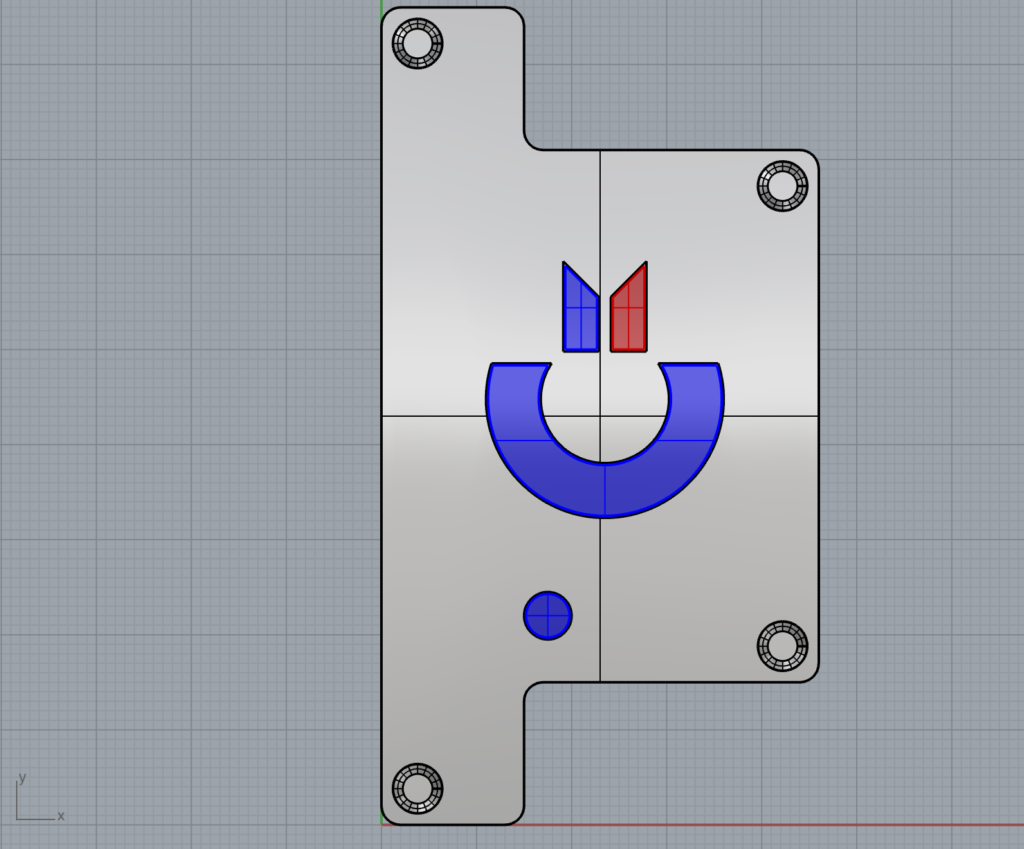
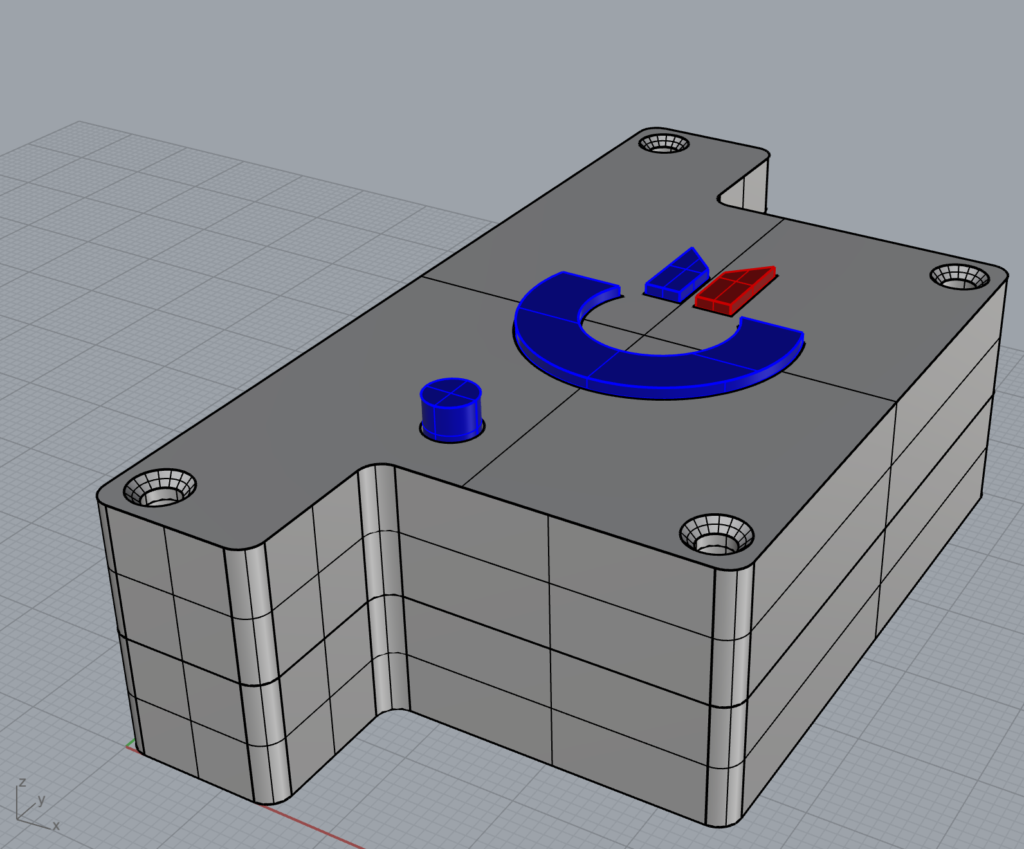
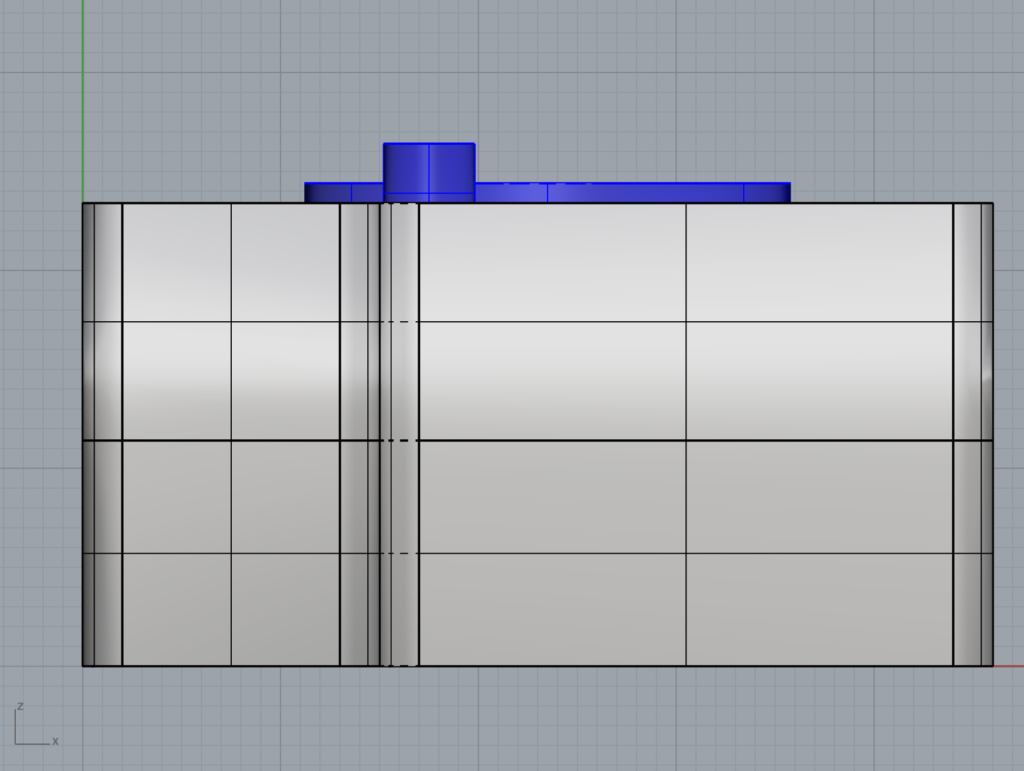
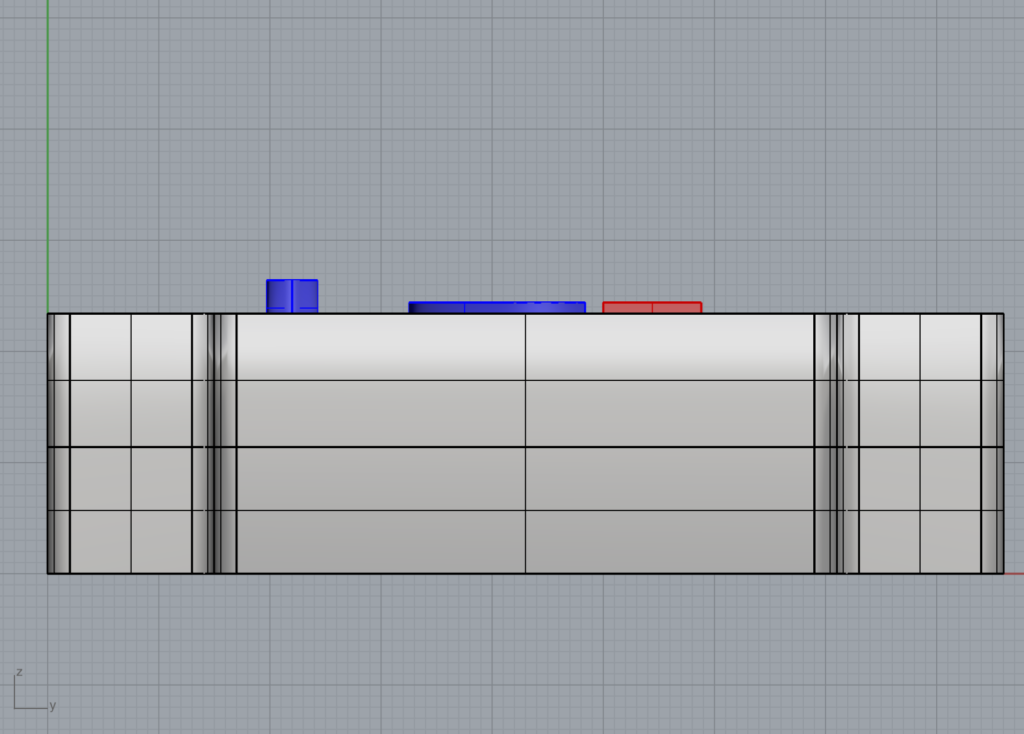
The definition above generates a polisurface inside Rhino 3D:
The final polisurface on Rhinoceros 3D.
Top
Perspective
Right
Front
Why am I so excited about Grasshopper? Well. If you need to correct the design because, for example, your printer PLA filament withdraw of few nanometers after the extrusion, you don’t need to redesign everything wasting one afternoon just to add one millimetre on a perimeter to prevent it: if your parametric design was prepared correctly, you just need to move a slider and to adjust all your surface/geometry in one single step.
With this method, I was able to speeded up the prototyping phase of my ideas from mere conception to a working tangible object. Just amazing!
I freely put the generated .stl files on Thingverse for everyone purchased the same device from gglabs.us and want to print his/her own case for it: https://www.thingiverse.com/thing:3940965
To see the final result of 3D printing, below a few photos of the RS232 version.
[Printed using a Flashforge Finder generation 1 with PLA filament.]
Thanks again to Giovanni for all the knowledge and patience he shared with me!
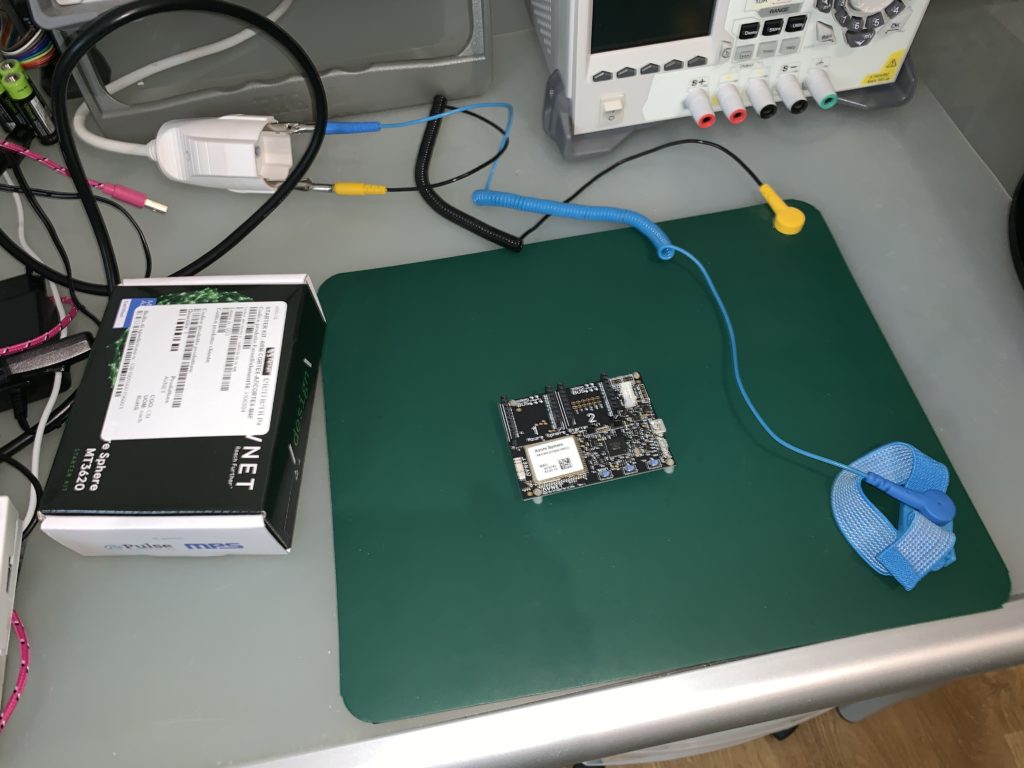
On the Green Pad this week I received from Farnell a Developer Kit for the new Microsoft Sphere. This is one of the multiple different iteration of a compatible IoT device reference-design for Sphere, that still in “Preview” as public Beta release (but should go public very soon, September fall).
AVNET Azure Sphere
Still that the AVG implementation is really interesting under various aspects. In particular, this version is the Avnet Azure Sphere MT3620 Starter Kit (product code AES-MS-MT3620-SK-G) and it’s a production-ready module based on the MediaTek MT3620 SoC, a Arm® Cortex™-A7 processor with the low overhead.
The design guarantees real-time thanks the two Arm Cortex-M4F microcontrollers; furthermore, the carrier board provides two MikroE Click expansion sockets and one Grove expansion connector (I2C), as sensors we can find 3-Axis accelerometer, 3-Axis gyroscope, temperature and pressure/barometric ones.
Currently, I don’t know exactly how to take fully advantage of this board in one of my projects, but it will be a good opportunity to try out Azure Sphere framework.
It is surely a wise move to give away few samples of these boards to make possible for developers to deepen on new technologies. It reminds me when I was working in Intel and we were giving away multiple devices (smartphones, tablets, ultrabooks, etc…) as reference design platforms and SDP (Software Development Platform) to developers to make them able to experiment with the newborn (at that time) Windows 8 ecosystem (such as WinRT runtime for Metro-apps) or with Android early x86-based implementations. Well Done Microsoft and AVNET!
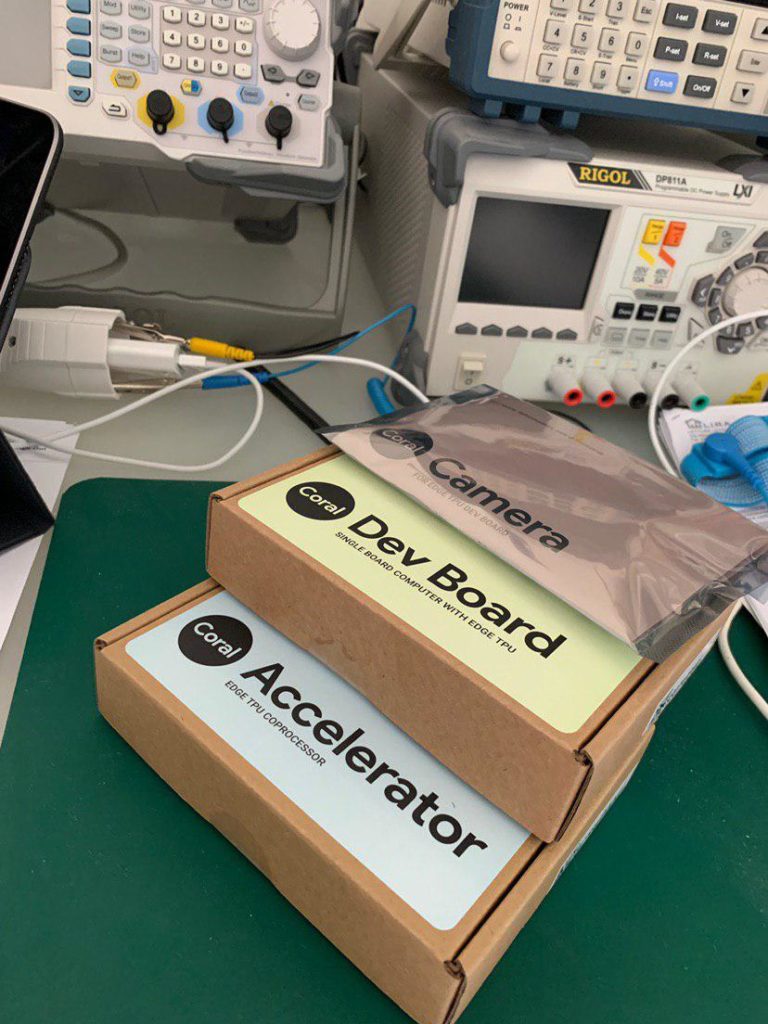
Google released a lineup of Edge TPU coprocessor-equipped devices called “Coral” with the intent of bring intelligence to the IoT devices at the edge. At this time the devices are two: the Coral Dev Board and the USB Accelerator; the first one is dedicated to develop an entire intelligent node from scratch, but the second one is meant to bring intelligence to an existing system. So, the USB Accelerator is the best solution if you have already you project developed and based on a Raspberry Pi, a UP board, a Orange Pi 3, or similar.
In this article, we will see how to implement the Coral USB Accelerator within a Raspberry Pi Zero.
Required hardware
1 x Raspberry Pi Zero (W)
1 x microSDHC class 6+ / 16+GB
1 x microUSB power supply (5V 2000mA/h)
1 x Google’s Coral USB Accelerator
Taking for granted you have a Raspberry Pi, this case “Zero” (but this should work as the same with other Raspbian-equipped boards) up and running. If you don’t know how to proceed I kindly suggest to follow the guide HERE.
Note: the Raspberry Pi Zero (W or not) is running on a Broadcom BCM2835 32-bit ARM11 (armv6* family) 76JZF-S processor clocked at 1GHz, single-core SoC equipped with 512MB RAM. Usually, the architecture is quite important detail when we manage hardware projects because we could enter in problem of pre-compilation conflicts with ARM SoCs. For example, if we have “armv7-a” pre-compiled binaries we will not able to work with 64-bit-based “armv8-a” CPUs, and even we have code sources, we could be not able to recompile it for our arch type. So, write down this detail!
Pre-Flight check of the Raspberry platform
We need to be sure that everything is up-to-date and we are both aligned on it. As I don’t need a Desktop environment, I opted for Raspbian Stretch Lite, based on Debian 9, and compiled for armv6l architecture (Note: NO armv7*!).
Open on the terminal (direclty on the Pi board, or via SSH).
Linux raspberrypi 4.19.42+ #1219 Tue May 14 21:16:38 BST 2019 armv6l GNU/Linux
Our Challenge
It’s time to call our bluff: the Google’s Edge TPU APIs is currently only compatible with the Raspberry Pi 3 (model A+ or B+), or its successors, x86 (32 or 64 bit), or other generic ARM64 platform architectures (“armv7l” or “aarch64)), but not with the 32bit low power, low cost, ARM SoC architecture we have on our Raspberry Pi Zero, or of the Raspberry Pi 1st Gen/2nd Gen.
So, what now? Well, we’ll try to find a workaround! 🙂
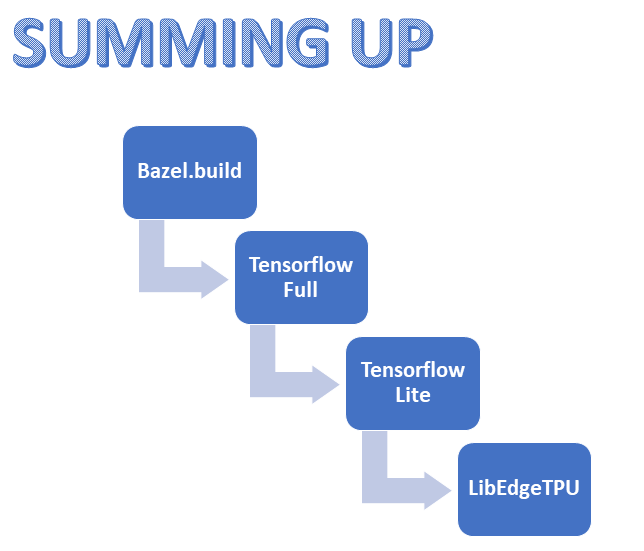
The most obvious thing it’s to recompile the Coral Edge TPU library for the “armv6l” but… it’s not so easy, unfortunately! The Edge TPU library is built upon Tensorflow Lite framework, that in turn is compiled on the “full” Tensorflow: so, we need to recompile Tensorflow before. To do that, we’ll need have a full installation of Blaze: a free software tool which allows for the automation of building and testing of software. But Blaze doesn’t support our “armv6l” out-of-the-box, so…
Recompiling BLAZE for “armv6l” architecture
To recompile Blaze we need more than 512 Mb of RAM. Not being able to upgrade the soldered built-in RAM on the board, we can create a digital RAM file with the needed size: it’s called “swap file”.
First of all, create a file which will be used as additional swap:
Set the permissions for the swapfile as only root should be able to write and read the swap file:
pi@raspberrypi:~ $ sudo chmod 600 /swapfile
Use the mkswap utility to set up the file as GNU/Linux swap area:
pi@raspberrypi:~ $ sudo mkswap /swapfile
Activate the swap file:
pi@raspberrypi:~ $ sudo swapon /swapfile
Then, let’s make the change permanent editing the /etc/fstab file:
pi@raspberrypi:~ $ sudo echo '/swapfile swap swap defaults 0 0' | sudo tee -a /etc/fstab > /dev/null
Verify that the swap file is active and working:
pi@raspberrypi:~ $ sudo swapon --show
You should clearly see /swapfile in the output. Or, in alternative:
pi@raspberrypi:~ $ sudo free -h
You should see the additional amount of swap space in the output. Now, you should adjust the swappiness value: this will force the the kernel to use the swap space more aggressively than usual.
pi@raspberrypi:~ $ sudo echo 'vm.swappiness=100' | sudo tee -a /etc/sysctl.conf > /dev/null
If you want, now you can reboot.
pi@raspberrypi:~ $ sudo reboot
Log back in and install few pre-requisite Debian packages:
It will also install automatically all the needed dependencies.
Now we can start working over bazel.build recompiling. Let’s download sources in a single and architecture-independent distribution archive from Bazel repository:
This task could require several hours. The compiled output is placed into output/bazel. For convenience we will copy this binary to /usr/local/bin (a directory that’s on your PATH).
As it’s always better to not use the Python packages manager (or packages index, a.k.a. pip) directly, let’s prepare a virtual environment to use a workspace.
As already briefly advanced before, the Google’s Coral USB Accelerator contains a Google Tensorflow (Co-)Processing Unit (a.k.a. TPU) and through its USB 3.0 Type-C socket can be connected to your (linux-based) development board.
What does it mean? The onboard Edge TPU allows to perform high performance machine/deep learning (convolution neural network) inferencing tasks without having a performing GPU.
To get started, perform the following steps:
pi@raspberrypi:~ $ cd
pi@raspberrypi:~ $ git clone https://coral.googlesource.com/edgetpu-native --branch release-chef
pi@raspberrypi:~ $ cd
pi@raspberrypi:~ $ wget https://dl.google.com/coral/edgetpu_api/edgetpu_api_latest.tar.gz -O edgetpu_api.tar.gz --trust-server-names
pi@raspberrypi:~ $ tar xzf edgetpu_api.tar.gz
pi@raspberrypi:~ $ cd edgetpu_api
Now, lets inject the Tensorflow binaries we need into the edgetpu_api folder.
pi@raspberrypi:~/edgetpu_api $ bash ./install.sh
Ok, that’s all for this first part. I hope you found this quick guide usefull. I am planning to continue with the second/final part of the article in the following weeks. I’ll work as well to add a final look setup and design for my project using the board and the TPU unit.
On the Green Pad this week arrived the Google’s Coral Computing@Edge devices: the Coral USB Accelerator and the Coral Dev Board. Both mount the Edge TPU running TensorFlow Lite framework that brings ML inferencing.
I am planning to write few articles on them… so, stay tuned! 😉
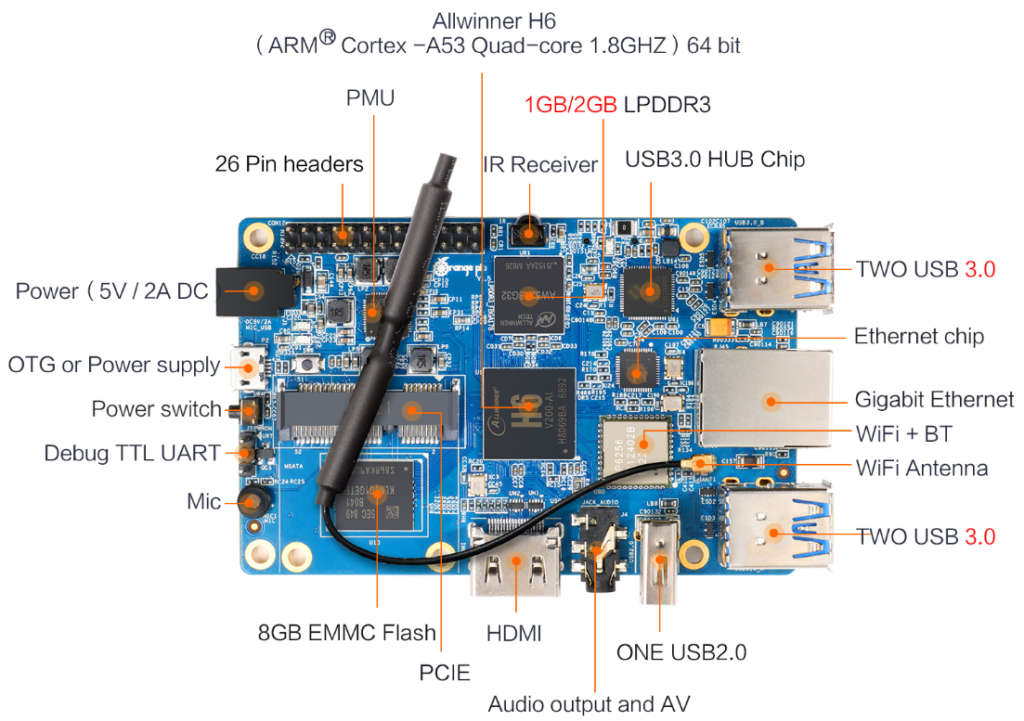
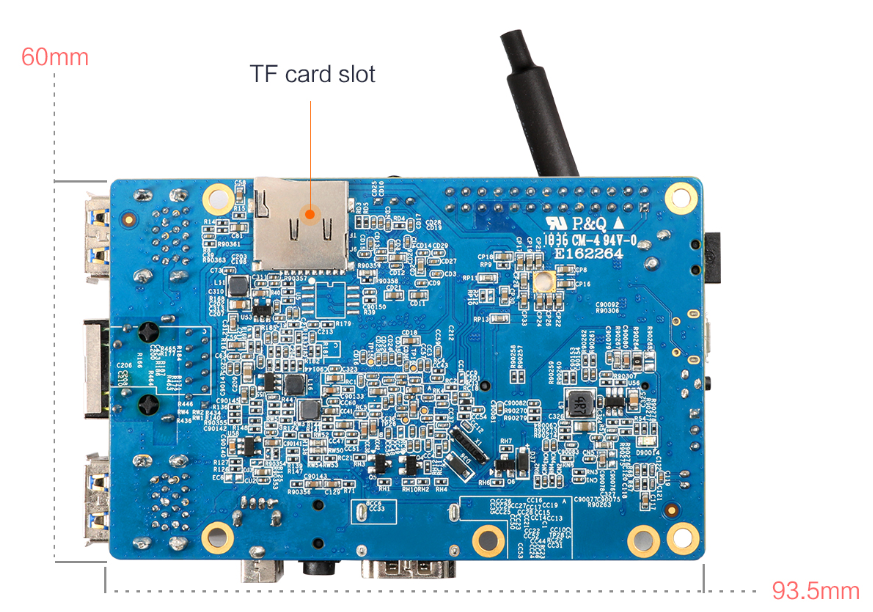
Orage Pi 3 is a really powerful development board, valid alternative of Raspberry Pi. It has a lot of different I/Os in addition respect to other dev boards clones: for example, on-board soldered eMMC (8GB), 4x full standard USB 3.0 ports, 1x USB 2.0 auxiliary port, PCI Express expansion connector, a powerful Allwinner H6 Quad-core 64-bit 1.8GHZ Cortex™-A53 and a DC input power supply connector (5V-2A).
Orange Pi 3 – upper view
Orange Pi 3 – bottom view
Orange Pi 3 is available in 4 variants: with/without 8GB emmc and 1GB/2GB onboard RAM. If we decide for the version missing the 8GB soldered emmc, we’ll need to use an external slower micro-SD(HC) memory, as on Raspeberry Pi.
Further details regard Orange Pi 3 can be found on the official site: orangepi.com.
Now. The idea is to install Intel OpenVINO toolkit/framework on a non-x86-based IoT platform.
What is Intel OpenVINO? It’s a toolkit that help to deploy software solutions with vision computing capabilities (aka Computer Vision, or abbreviated simply CV), and it’s based on a Convolutional Neural Network (CNN) framework. The OpenVINO distribution includes also the Intel DLDT (Deep Learning Deployment Toolkit).
Intel provides a version of OpenVINO™ for GNU/Linux OSs, but it requires a 64bit Intel processor (6th+ generation or Xeon™) and this is not our case as we are playing with a ARM-based cpu.
Otherwise, Intel has released also a 32bit ARM-based version adequate to be installed on the Raspberry Pi: so, optimized specifically to be installed on Raspbian OS and including the OpenVINO Inference Engine, OpenCV, the MYRIAD plugin and few example applications.
Specifically, the Inference Engine is the most important component as it runs the deep learning model. It is composed by a C++ library with a subset of C++ classes to infer input data (images) and get a result; and it provides APIs to read the Intermediate Representation, to set the input and output formats and to execute the model on devices.
Few last notes before starting:
The OpenVINO toolkit was formerly known as the Intel® Computer Vision SDK.
These steps have been validated with Orange Pi 3 (2GB RAM + 8GB on-board eMMC) but they should work also for other Orange Pi development boards.
An internet connection is required to follow the steps in this guide.
These steps have been validated to work with the Intel® Movidius™ Neural Compute Stick (Intel® NCS) plugged in one of USB ports but they should work without modifications with the Intel® Neural Compute Stick 2.
Required hardware
1 x Orange Pi 3
1 x microSDHC class 6+ / 32+GB
1 x power supply (5V 3000mA/h) with microUSB or 4×1.7mm socket
Method 1: using the official Debian image for Orange Pi 3
Statement of the problem here: this method was harder that expected as the official Debian image released by Xunlong Software CO. (manufacturer of Orange Pi boards) is versioned as Jessie (Debian 8) and compiled for “aarch64” architecture. Unfortunately, Jessie is now labeled as “oldstable” and all its repository were moved to Debian Archive: this cause few issue that we’ll try to bypass with the following steps.
Ok. Let’s start.
First of all I’ll take for granted that you already have a working board with the official release of Debian 8 “Jessie” Server for Orange Pi 3 on it (image named “OrangePi_3_jessie_server_v1.0.img”). You can follow instructions in the manual to do it. In addition, I am also taking for granted that your Orange Pi 3 is connected to the internet: we’ll need to download few files (also, date/time need to be adjusted). If not, I suggest to use nmtui to do so.
Now. As I already stated briefly before, Debian 8 is not the best as its repository seems to be not complete anymore (for example, “binary-amr64” and others are now missing). We’ll need to upgrade from Debian 8 to Debian 9 (from “Jessie” to “Stretch”) as we’ll need to install few packages from the repositories.
deb http://ftp.debian.org/debian/ stretch main contrib non-free
#deb-src http://ftp.debian.org/debian/ stretch main contrib non-free

deb http://ftp.debian.org/debian/ stretch-backports main contrib non-free
#deb-src http://ftp.debian.org/debian/ stretch-backports main contrib non-free

deb http://security.debian.org/ stretch/updates main contrib non-free
#deb-src http://security.debian.org/ stretch/updates main contrib non-free

deb http://ftp.debian.org/debian/ stretch-updates main contrib non-free
#deb-src http://ftp.debian.org/debian/ stretch-updates main contrib non-free
[Ctrl+X], “y” and [ENTER] to save and exit from the editor. Now we can update the repositories with:
Feel free to reboot now! Unfortunately, it seems that reboot command is not well supported by the board (at least on mine). So just shutdown and power up back the board manually:
~$ sudo shutdown -h now
To be sure that everything worked properly, we need now to perform database sanity and consistency checks for partially installed, missing and obsolete packages through the command:
~$ sudo dpkg -C
~$ sudo apt-mark showhold
Hopefully you are not receiving any message by the commands above. So, keep moving! (If yes, sympathy for you: troubleshoot.)
As prerequisite, we need now to install few packages:
Modify the setupvars.sh script by replacing with the absolute path to the installation folder:
~/OpenVINOfiles$ sudo sed -i "s|<INSTALLDIR>|/opt/intel/openvino|" /opt/intel/openvino/bin/setupvars.sh
~/OpenVINOfiles$ sudo sed -i 's/armv7l/aarch64/gI' /opt/intel/openvino/bin/setupvars.sh
~/OpenVINOfiles$ sudo sed -i 's/Raspbian/Debian/gI' /opt/intel/openvino/bin/setupvars.sh
To compile and run the OpenVINO toolkit applications on the board an update for the system environment variables is required, the setupvars.sh script will update them for us.
Remember: you should run the setupvars.sh script everytime you’ll open a shell and you want to play with OpenVINO. If you want to make the process automatic you can edit the bash runtime configuration file as follows:
Unfortunately, the default user “orangepi” is not part of “users” group on the system, so we need to patch with:
~$ sudo usermod -a -G users "$(whoami)"
Now, if you own a Intel Movidius Neural Compute Stick or a Intel Neural Compute Stick 2 it’s time to attach it in one of the USB 3.0 (the blue ones) socket; then, reboot.
~/OpenVINOfiles$ sudo shutdown -h now
Switch back on and Log In again. To be able to perform inference on the Movidius devices, you need to set USB rules through:
Unfortunately, we can not use the pre-compiled version of opencv contained in the Raspberry package. So we’ll need to compile it from its sources for the aarch64 architecture:
~$ cd OpenVINOfiles
~/OpenVINOfiles$ git clone https://github.com/opencv/opencv.git
~/OpenVINOfiles$ git clone https://github.com/opencv/opencv_contrib.git
~/OpenVINOfiles$ cd ~/opencv
~/OpenVINOfiles$ mkdir build
~/OpenVINOfiles$ cd build
~/OpenVINOfiles$ cmake -D CMAKE_BUILD_TYPE=Release -D CMAKE_INSTALL_PREFIX=/usr/local ..
Correcting few files written for armv7l (the cpu of the Raspberry gen 1) to be compiled on aarch64 (the cpu presents on our Orange Pi 3):
~/OpenVINOfiles$ sudo sed -i 's/armv7l/aarch64/gI' /opt/intel/openvino/deployment_tools/inference_engine/samples/CMakeLists.txt
~/OpenVINOfiles$ sudo sed -i 's/armv7l/aarch64/gI'  /opt/intel/openvino/deployment_tools/inference_engine/share/InferenceEngineConfig.cmake
~/OpenVINOfiles$ git clone https://github.com/fbaldassarri/opencv-sun50iw6p1.git
~/OpenVINOfiles$ cd opencv-sun50iw6p1
~/OpenVINOfiles/opencv-sun50iw6p1$ sudo cp -R lib/* /opt/intel/openvino/opencv/lib
~/OpenVINOfiles/opencv-sun50iw6p1$ cd ..
To be able to run pre-trained network (for example, Face Detection or Object Detection) using the Inference Engine you’ll need to create/navigate to a directory of which you have read/write permissions. Let’s create one as subfolder of our OpenVINOfiles:
~/OpenVINOfiles$ mkdir build
~/OpenVINOfiles$ cd build
Let’s try compiling through cmake the Inference Engine samples provided by Intel inside the OpenVINO distribution toolkit:
The application should output an image (out_0.bmp) with detected faced enclosed in rectangles.
Time to clean up our workspace:
~/OpenVINOfiles/build$ cd
~/OpenVINOfiles$ cd OpenVINOfiles
~/OpenVINOfiles$ rm -r l_openvino_toolkit_raspbi_p_2019.1.094.tgz
~/OpenVINOfiles$ rm -r opencv-sun50iw6p1
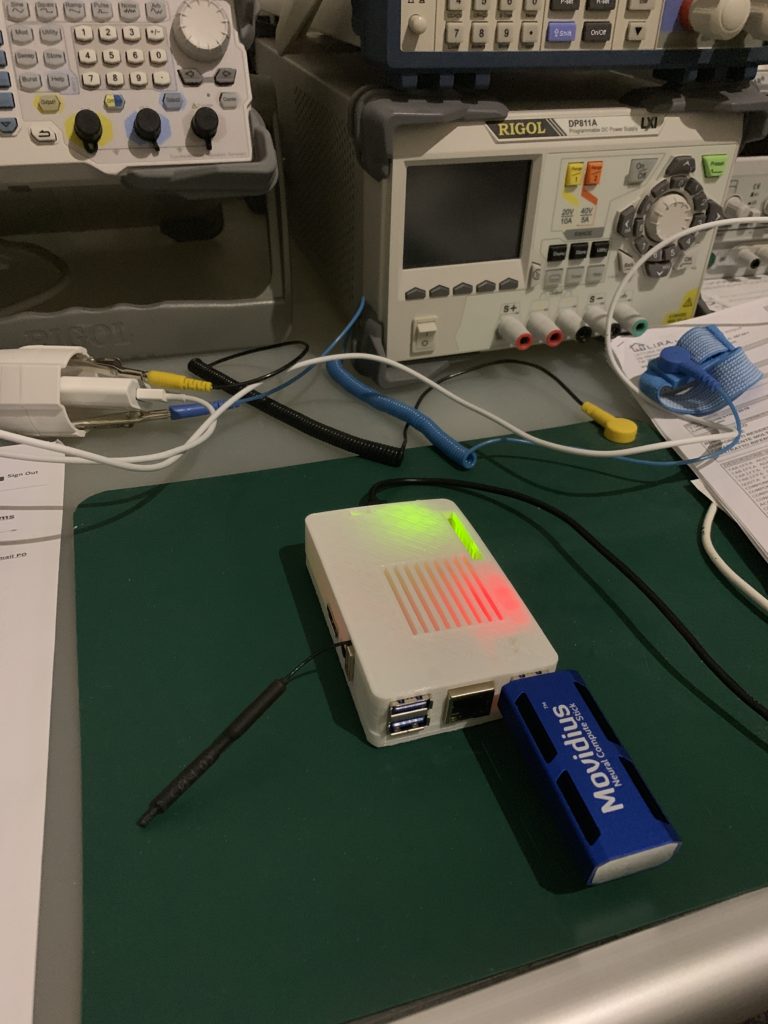
Orange Pi 3 enclosed in a 3D printed case and with the Intel® Movidius™ Neural Compute Stick
Method 2: using the un-official Armbian image for Orange Pi 3
Statement of the problem here: the image of Armbian is not official release of Xunlong Software CO. and it could not support completely all the features of Orange Pi 3 board; in addition, it still in “unstable” release. But, it is already updated at Debian 9 “Stretch” and it has few interesting tweaks.
The process is quite the same of the method 1, but first of all you need to use the latest nightly build of Armbian for Orange Pi 3 at the following link: https://dl.armbian.com/orangepi3/.
Since 2012, I supported Codemotion through my different incarnation in different companies. Before as Developer Relations Manager in Intel, and then as Cloud Community Manager for Google.
Thanks to Codemotion I always had the chance to present and front of a wide audience of students, hobbiests, but mainly little or big professionals.
My talk was dedicated to IoT: in particular, my idea was to deliver something inspirational and technological at the same time, opening eyes on how much important is nowadays to bring intelligence directly to the edge in our IoT scenarios, avoiding useless consumptions of Cloud resources (internal and external network bandwidth, virtual machines configurations, etc…).
IoT revolution is ended. Thanks to hardware improvement, building an intelligent ecosystem is easier than never before for both startups and large-scale enterprises. The real challenge is now to connect, process, store and analyze data: in the cloud, but also, at the edge. We’ll give a quick look on frameworks that aggregate dispersed devices data into a single global optimized system allowing to improve operational efficiency, to predict maintenance, to track asset in real-time, to secure cloud-connected devices and much more.